Docker Basic
Preface
Einfach nur weg.
With the help of Docker I deployed the environment of Tongji CTF 2017. Now I want to learn more about it.
I learn from The Docker Book.
My environment:
OS: Mac OSX
Docker: Docker version 18.06.1-ce, build e68fc7a
The Docker Book: v1.9.1
Part 1 Basics of Docker
Container is a space based and operating on the OS’s kernel.
Docker components:
- Docker client/server (Docker engine)
- Docker images
- Registry
- Docker containers
Image is a layer-structure based on Union File System.
Registry is used to store images. One registry is Docker Hub.
One Docker container contains:
- one image
- a series of operations
- one environment for execution
Techniques used by Docker:
- LinuX Container (libcontainer from Docker v0.9)
- Linux namespace
- Isolation of filesystem (similar to chroot)
- Isolation of process
- Isolation of network
- Linux cgroups (quotas of resources)
- Copy on Write
- Log
- Interactive shell
I will skip the procedure of installation. But remember that Docker currently doesn’t support 32-bit CPU.
To have a overview of your Docker:
> docker info

Containers: 0
 Running: 0
 Paused: 0
 Stopped: 0
Images: 0
Server Version: 18.06.1-ce
Part 2 Basic Usage
Run Ubuntu:
# -i Keep STDIN open even if not attached
# -t Allocate a pseudo-TTY
docker run -i -t ubuntu /bin/bash
We can see:
Unable to find image 'ubuntu:latest' locally
latest: Pulling from library/ubuntu
473ede7ed136: Pull complete
c46b5fa4d940: Pull complete
93ae3df89c92: Pull complete
6b1eed27cade: Pull complete
Digest: sha256:29934af957c53004d7fb6340139880d23fb1952505a15d69a03af0d1418878cb
Status: Downloaded newer image for ubuntu:latest

root@b9519965e109:/# whoami
root
# -d Run container in background and print container ID
docker run -d ubuntu

# then you can attach
docker attach 6a02d9b3e99a
In container’s shell:
root@4f8d0593c5cb:/# cat /etc/hosts

127.0.0.1	localhost
::1	localhost ip6-localhost ip6-loopback
fe00::0	ip6-localnet
ff00::0	ip6-mcastprefix
ff02::1	ip6-allnodes
ff02::2	ip6-allrouters
172.17.0.3	4f8d0593c5cb
Now it doesn’t have ifconfig/ping, so we should install them:
apt-get update
apt-get install net-tools
apt-get install iputils-ping
Now we can
root@4f8d0593c5cb:/# ifconfig
eth0: flags=4163<UP,BROADCAST,RUNNING,MULTICAST>  mtu 1500
        inet 172.17.0.3  netmask 255.255.0.0  broadcast 172.17.255.255
        ether 02:42:ac:11:00:03  txqueuelen 0  (Ethernet)
        RX packets 11287  bytes 15933081 (15.9 MB)
        RX errors 0  dropped 0  overruns 0  frame 0
        TX packets 6814  bytes 372868 (372.8 KB)
        TX errors 0  dropped 0 overruns 0  carrier 0  collisions 0

lo: flags=73<UP,LOOPBACK,RUNNING>  mtu 65536
        inet 127.0.0.1  netmask 255.0.0.0
        loop  txqueuelen 1  (Local Loopback)
        RX packets 0  bytes 0 (0.0 B)
        RX errors 0  dropped 0  overruns 0  frame 0
        TX packets 0  bytes 0 (0.0 B)
        TX errors 0  dropped 0 overruns 0  carrier 0  collisions 0
Some other useful commands:
# create a container without running it
docker create

# show logs
docker logs 6a02d9b3e99a

# show processes
docker top 6a02d9b3e99a

# monitor a container
docker stats 6a02d9b3e99a

# restart a container automatically when it stops
docker run --restart=always ...

# remove a container
docker rm 6a02d9b3e99a
# remove all containers
docker rm `docker ps -a -q`

# show images
docker images
To get more information about a container:
docker inspect 6a02d9b3e99a
and you will get:
[
    {
        "Id": "6a02d9b3e99ad5696673e70b3dba163bd05d6d7511d6ed1e66448628245a4105",
        "Created": "2018-10-20T02:30:12.241144882Z",
        "Path": "/bin/bash",
        "Args": [],
        "State": {
            "Status": "exited",
            "Running": false,
            "Paused": false,
            "Restarting": false,
            "OOMKilled": false,
            "Dead": false,
            "Pid": 0,
            "ExitCode": 255,
            "Error": "",
            "StartedAt": "2018-10-20T02:49:12.927284303Z",
            "FinishedAt": "2018-10-20T11:11:48.307145324Z"
        },
        "Image": "sha256:ea4c82dcd15a33e3e9c4c37050def20476856a08e59526fbe533cc4e98387e39",
    ...
Part 3 Image and Registry
Image
One Docker Image is a combination of file system.
To understand the structure of Docker Image, you can read this blog.
Docker containers are building blocks for applications. Each container is an image with a readable/writeable layer on top of a bunch of read-only layers.
These layers (also called intermediate images) are generated when the commands in the Dockerfile are executed during the Docker image build.
For example, here is a Dockerfile for creating a node.js web app image. It shows the commands that are executed to create the image.
FROM node:argon
# Create app directory
RUN mkdir -p /usr/src/app
WORKDIR /usr/src/app
# Install app dependencies
COPY package.json /usr/src/app/
RUN npm install
# Bundle app source
COPY . /usr/src/app
EXPOSE 8080
CMD [ "npm", "start" ]
We can see the layers:
docker history expressweb

IMAGE         CREATED    CREATED BY                       SIZE
fdd93d9c2c60  2 days ago /bin/sh -c CMD ["npm" "start"]   0 B
e9539311a23e  2 days ago /bin/sh -c EXPOSE 8080/tcp       0 B
995a21532fce  2 days ago /bin/sh -c COPY dir:50ab47bff7   760 B
ecf7275feff3  2 days ago /bin/sh -c npm install           3.439 MB
334d93a151ee  2 days ago /bin/sh -c COPY file:551095e67   265 B
86c81d89b023  2 days ago /bin/sh -c WORKDIR /usr/src/app  0 B
7184cc184ef8  2 days ago /bin/sh -c mkdir -p /usr/src/app 0 B
530c750a346e  2 days ago /bin/sh -c CMD ["node"]          0 B
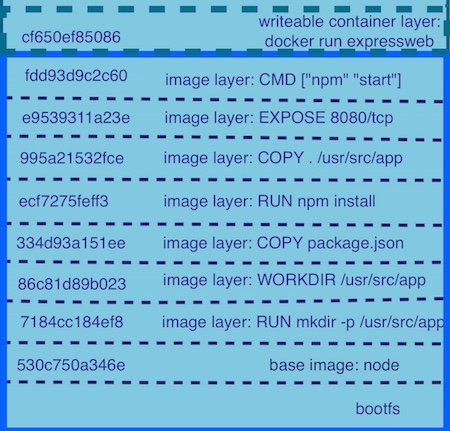
The image below is called parent image, the image at bottom (not bootfs) called base image. The image is just like a stack.
When we want to modify a file, it will be copy from the read-only layer below to the writeable layer on the top. That is Copy on Write.
We can pull images from the Registry:
docker pull ubuntu:12.04

12.04: Pulling from library/ubuntu
d8868e50ac4c: Pull complete
83251ac64627: Pull complete
589bba2f1b36: Pull complete
d62ecaceda39: Pull complete
6d93b41cfc6b: Pull complete
Digest: sha256:18305429afa14ea462f810146ba44d4363ae76e4c8dfc38288cf73aa07485005
Status: Downloaded newer image for ubuntu:12.04
We can also search a specific image in the public Registry:
docker search php

NAME                                                      DESCRIPTION                                     STARS               OFFICIAL            AUTOMATED
php                                                       While designed for web development, the PHP …   3950                [OK]
phpmyadmin/phpmyadmin                                     A web interface for MySQL and MariaDB.          629                                     [OK]
richarvey/nginx-php-fpm                                   Container running Nginx + PHP-FPM capable of…   627                                     [OK]
composer                                                  Composer is a dependency manager written in …   287                 [OK]
adminer                                                   Database management in a single PHP file.       169                 [OK]
php-zendserver                                            Zend Server - the integrated PHP application…   155                 [OK]
webdevops/php-nginx                                       Nginx with PHP-FPM                              114                                     [OK]
webdevops/php-apache-dev                                  PHP with Apache for Development (eg. with xd…   81                                      [OK]
webdevops/php-apache                                      Apache with PHP-FPM (based on webdevops/php)    74                                      [OK]
phpunit/phpunit                                           PHPUnit is a programmer-oriented testing fra…   63                                      [OK]
...
Then you can pull the images you want.
Construction of Image
There are two ways to construct a image:
- docker commit
- docker build & dockerfile
Docker Commit
This method is that we firstly create a container and make some modifications, then commit it just like in Git.
Firstly I create an account on Docker Hub.

Certainly you can use docker logout to log out.
Then we create a container and install apache2:
docker run -it ubuntu /bin/bash

root@22c32f686dcd:/# apt-get -y update && apt-get -y install apache2
root@22c32f686dcd:/# exit
exit
Now commit it:
docker commit 22c32f686dcd 0x08048000/apache2

sha256:ee86ff0e825a18929a9c72a59c5971f8c2b413b6ebe301a29a736dea7aaf55ab
Then we can see it:
docker images

REPOSITORY           TAG                 IMAGE ID            CREATED             SIZE
0x08048000/apache2   latest              ee86ff0e825a        11 seconds ago      205MB
ubuntu               latest              ea4c82dcd15a        35 hours ago        85.8MB
# you can also push it onto Docker Hub
docker push 0x08048000/apache2:latest
Dockerfile
The experiment is in a directory:
mkdir test_docker
cd test_docker
touch Dockerfile
Edit the Dockerfile:
# my first dockerfile
FROM ubuntu:14.04
MAINTAINER Bonan Ruan "xxx@rambo.com"

# executed when the image is being constructed
RUN apt-get update && apt-get install -y nginx
RUN echo "Hi, I am in your container" > /usr/share/nginx/html/index.html

# just tell docker that the container will use the port below
# but that port will not be opened automatically,
# you must open it use `-p PORT_NUM` or `-P` when `docker run`
EXPOSE 80
RUN actually is /bin/sh -c in the container. And you can also use the instruction below to replace it.
RUN ["apt-get", "install", "-y", "nginx"]
Now let’s build it:
docker build -t="0x08048000/test_docker" .
. means the Dockerfile is just in the current directory.
We can see the process, which is helpful for us to understand the construction of image:
Sending build context to Docker daemon  2.048kB
Step 1/5 : FROM ubuntu:14.04
14.04: Pulling from library/ubuntu
027274c8e111: Pull complete
d3f9339a1359: Pull complete
872f75707cf4: Pull complete
dd5eed9f50d5: Pull complete
Digest: sha256:e6e808ab8c62f1d9181817aea804ae4ba0897b8bd3661d36dbc329b5851b5637
Status: Downloaded newer image for ubuntu:14.04
 ---> f216cfb59484
Step 2/5 : MAINTAINER Bonan Ruan "xxx@rambo.com"
 ---> Running in 312dcb5386a9
Removing intermediate container 312dcb5386a9
 ---> 0bf1e21c7acb
Step 3/5 : RUN apt-get update && apt-get install -y nginx
 ---> Running in d3885878b85f
... (just install)
Removing intermediate container d3885878b85f
 ---> dde125c563b6
Step 4/5 : RUN echo "Hi, I am in your container" > /usr/share/nginx/html/index.html
 ---> Running in 10f398471651
Removing intermediate container 10f398471651
 ---> 6edb873eca37
Step 5/5 : EXPOSE 80
 ---> Running in 22159b8de19b
Removing intermediate container 22159b8de19b
 ---> bc9bd08deb59
Successfully built bc9bd08deb59
Successfully tagged 0x08048000/test_docker:latest
If an error occurs because one instruction in the dockerfile is wrong, then you can use the intermediate image to debug:
docker run -it INTERMEDIATE_IMAGE_ID /bin/bash
After modifying your dockerfile the building process will be very quick because the stages before the location you modified have been cached. If you want to build it from the very beginning, just
docker build --no-cache -t="xxx"
Let’s run our image:
# You should decide which port on the host to be used to be mapped.
docker run -d -p 10000:80 --name test_docker 0x08048000/test_docker nginx -g "daemon off;"

409c4fba6c91787e81abd6009e84a7bac198cbcdecd387efce18e1206f607103
It works!
docker container ls

CONTAINER ID        IMAGE                    COMMAND                  CREATED             STATUS              PORTS                   NAMES
409c4fba6c91        0x08048000/test_docker   "nginx -g 'daemon of…"   19 seconds ago      Up 17 seconds       0.0.0.0:10000->80/tcp   test_docker
Visit it with Safari:

Other gadgets that can be used in a Dockerfile:
# set environment variable
ENV REFRESHED_AT 2014-07-01

# will be executed when the container starts
# but when you use `docker run xxx COMMAND`, then COMMAND will replace the command in CMD
# only one CMD can be written in Dockerfile
CMD ["/bin/bash", "-l"]

# similar to CMD, but it will not be replaced by the COMMAND when we do `docker run`
# instead, the OPTIONS in `docker run xxx OPTIONS` will be delivered to ENTRYPOINT as arguments
# the OPTIONS in CMD will also be delivered to ENTRYPOINT as arguments
ENTRYPOINT ["/usr/sbin/nginx"]

# just set the work directory
WORKDIR /home/ubuntu/

# who will run in the container
USER user:group

# add files to image, when adding compressed file, it will be decompressed in the image
ADD readme.md /home/ubuntu/

# just like ADD without decompression
COPY readme.md /home/ubuntu/
Part 4 Docker Practice
Docker for Static Website
Use Docker to deploy a static website.
Construction of Nginx
mkdir sample && cd sample
touch Dockerfile

mkdir nginx
cp ~/GitBox/dockerbook-code/code/5/sample/nginx/nginx.conf ./nginx/
cp ~/GitBox/dockerbook-code/code/5/sample/nginx/global.conf ./nginx/
The contents of these two config-files:
# global.conf
server {
        listen          0.0.0.0:80;
        server_name     _;

        root            /var/www/html/website;
        index           index.html index.htm;

        access_log      /var/log/nginx/default_access.log;
        error_log       /var/log/nginx/default_error.log;
}

# nginx.conf
user www-data;
worker_processes 4;
pid /run/nginx.pid;
daemon off;

events {  }

http {
  sendfile on;
  tcp_nopush on;
  tcp_nodelay on;
  keepalive_timeout 65;
  types_hash_max_size 2048;
  include /etc/nginx/mime.types;
  default_type application/octet-stream;
  access_log /var/log/nginx/access.log;
  error_log /var/log/nginx/error.log;
  gzip on;
  gzip_disable "msie6";
  include /etc/nginx/conf.d/*.conf;
}
Why should we configure nginx in the non-daemon mode?
According to this blog and this question, the container will exit immediately after the command to fork a daemon of nginx exits. So we must let nginx run in foreground.
Then we edit the Dockerfile:
FROM ubuntu:16.04
LABEL maintainer="xxx@rambo.com"
ENV REFRESHED_AT 2018-10-21

RUN apt-get -qq update && apt-get -qq install nginx

RUN mkdir -p /var/www/html/website
ADD nginx/global.conf /etc/nginx/conf.d/
ADD nginx/nginx.conf /etc/nginx/

EXPOSE 80
Ok. Now let’s build it:
docker build -t 0x08048000/nginx .
Construction of Sample Website
mkdir website
cp ~/GitBox/dockerbook-code/code/5/sample/website/index.html ./website/
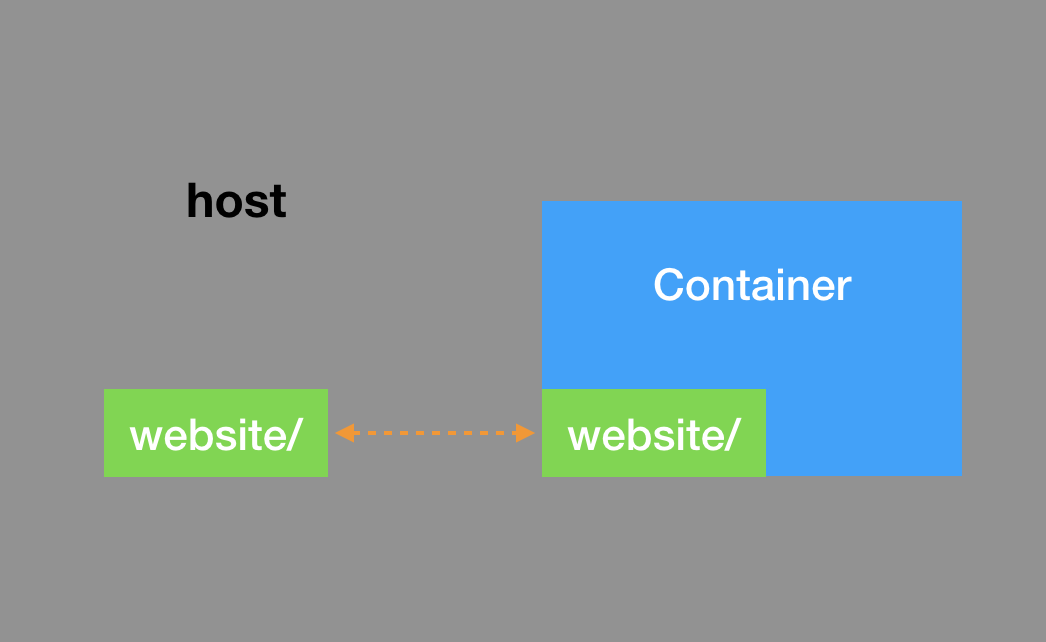
docker run -d -p 10000:80 --name website -v $PWD/website:/var/www/html/website:ro 0x08048000/nginx:latest nginx
-v $PWD/website:/var/www/html/website:ro is to mount a volume onto the container. It can just be added when docker run and has nothing to do with the image. It can be shared by different containers. ro/rw means read only/read&write.
Then we get:
curl 127.0.0.1:10000

<head>

<title>Test website</title>

</head>

<body>

<h1>This is a test website</h1>

</body>
By this way we can modify our website easily without re-constructing the image or restarting the container.
Docker Connection
In this section we will introduce two methods to connect different containers:
- Docker networking
- Docker link
If your Docker’s version is < 1.9, you should use Docker link. Otherwise you should use Docker networking.
Docker networking can connect a container to containers on another different host. And it won’t be affected by the start, stop or restart of one container. So it is prefered.
Docker-Networking
Firstly, we can see the current network for Docker:
docker network ls
NETWORK ID          NAME                DRIVER              SCOPE
4bfba45c28ca        bridge              bridge              local
835ac9f074e7        host                host                local
8d43371933a1        none                null                local
Then we can create a new network:
docker network create test_network
5a600f4b0fb845d6b21f3086e72fc396cae8a3ec4a484ef4c18b20e74e875e36

docker network inspect test_network
[
    {
        "Name": "test_network",
        "Id": "5a600f4b0fb845d6b21f3086e72fc396cae8a3ec4a484ef4c18b20e74e875e36",
        "Created": "2018-10-22T12:28:58.516233614Z",
        "Scope": "local",
        "Driver": "bridge",
        "EnableIPv6": false,
        "IPAM": {
            "Driver": "default",
            "Options": {},
            "Config": [
                {
                    "Subnet": "172.18.0.0/16",
                    "Gateway": "172.18.0.1"
                }
            ]
        },
        "Internal": false,
        "Attachable": false,
        "Ingress": false,
        "ConfigFrom": {
            "Network": ""
        },
        "ConfigOnly": false,
        "Containers": {},
        "Options": {},
        "Labels": {}
    }
]
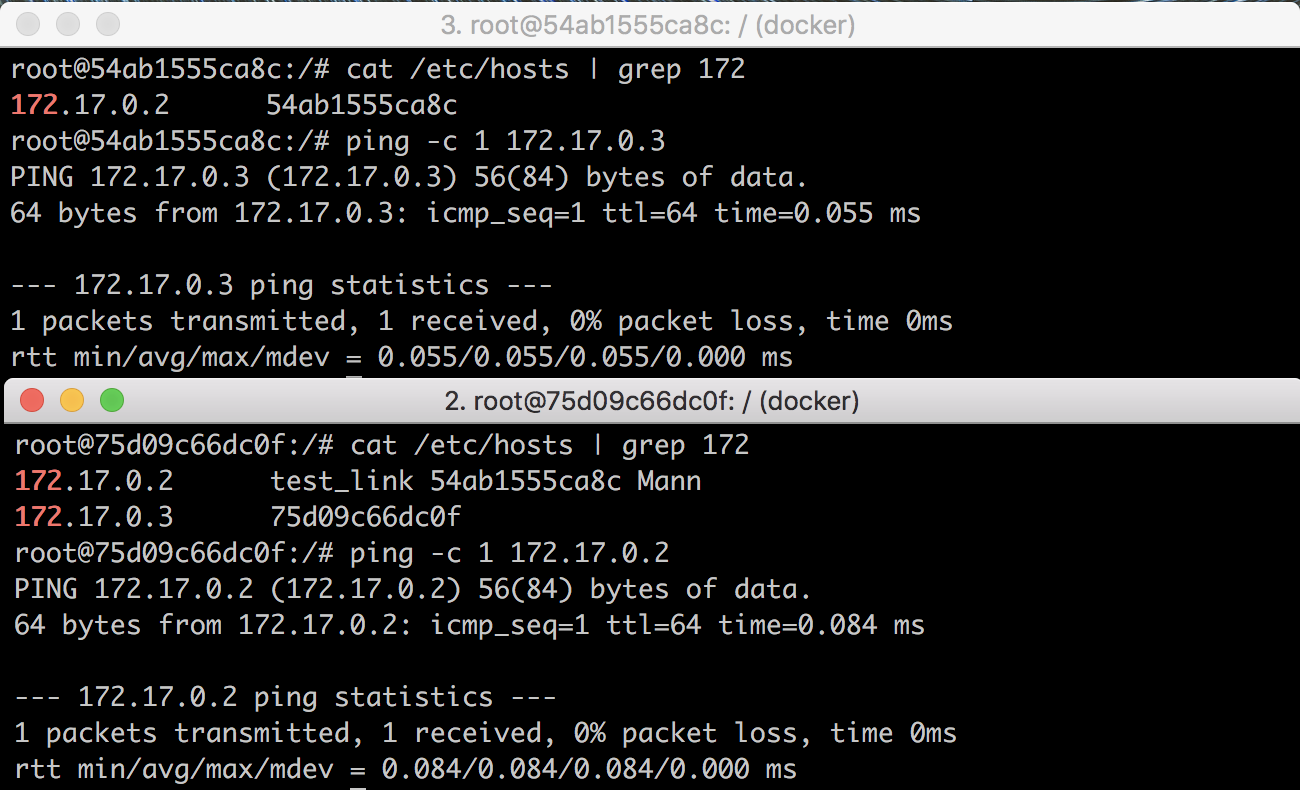
Now we run two containers:
docker run -it --net=test_network ubuntu /bin/bash
root@64e6b111de7c:/#

docker run -it --net=test_network ubuntu /bin/bash
root@456fb91acb07:/#
Then docker network inspect test_network:
        "Containers": {
            "456fb91acb07714ca791b12e5bc10a925caeeb36ff3d3731799b61a3401e84ca": {
                "Name": "keen_lovelace",
                "EndpointID": "8929a080bc07f1cf49a8d045cb3d6d52a0b582f46afb6bc1dba499b4e7c54a99",
                "MacAddress": "02:42:ac:12:00:03",
                "IPv4Address": "172.18.0.3/16",
                "IPv6Address": ""
            },
            "64e6b111de7c64defc1ee80dfdabf2cd91fa4c72fe18710275b3fbdca5d9a0d1": {
                "Name": "amazing_shockley",
                "EndpointID": "538b3e24d58e41ce39534bc2393ed95d403a7d402d2f881594412a91101d9b1a",
                "MacAddress": "02:42:ac:12:00:02",
                "IPv4Address": "172.18.0.2/16",
                "IPv6Address": ""
            }
        },
apt-get update && apt-get install nmap net-tools iputils-ping
then:

More details:
docker network
connect     -- Connect a container to a network
create      -- Creates a new network with a name specified by the user
disconnect  -- Disconnects a container from a network
inspect     -- Displays detailed information on a network
ls          -- Lists all the networks created by the user
prune       -- Remove all unused networks
rm          -- Deletes one or more networks
Docker-Link
This is also easy:
docker run -it --name Mann ubuntu /bin/bash
docker run -it --name Frau --link Mann:test_link ubuntu /bin/bash
这部分给了我很大启发:未来在搭建漏洞复现环境或者渗透测试环境时——尤其是那种具有复杂网络特征的环境——完全可以使用Docker来做。
Summary
So this is the basic knowledge of Docker.